
Objectives
In this exercise, you will:
Login to Coder in order to use Linux resources.
Use Linux commands to interact with files and folders.
Use VS Code to edit, compile, and run a program.
1. Introduction
Welcome to CS112!
In this first lab exercise, we will introduce the Visual Studio Code editor, and see how we can use it to write a C++ program. The exercise assumes access to a C++ compiler (e.g., GNU’s gcc/g++), the make utility through the Coder system, and that VS Code have all been installed on your system.
You should also be familiar with basic C++ principles. For that, review 1.4. Let’s look at a C++ program if you are coming into this class from CS10X and are used to Python.
This lab tells you how to use VS Code in the Coder system of the CS Department. It will be required to use the terminal for a Linux environment.
2. Using Linux
A goal for this class is for you to start to feel comfortable in Linux, and especially the Linux terminal (or command line). These are useful skills to practice, as they will allow you to login to a remote system (e.g., from home) and work with your files remotely. If you have not experience with Linux commands in the terminal, you may want to work through this Tutorial on your own time.
3. Coder
The Calvin Computer Science department offers the Coder service for this and other CS classes. Please take a moment to log into Coder using your web browser. Sign in using your full Calvin email address. When you log in, you will need to make your workspace for CS112.
Do this:
Open the URL https://
coder .cs .calvin .edu New workspace -> Calvin CS Linux
Complete the form, using the name of “cs112”. Leave the rest of the options the default, and click “Create workspace”.
After a few seconds, your workspace should start. Please leave this browser window open for future steps.

How your Coder workspace should look.
4. Where to Store your CS112 Work
You will have many assignments in CS112, and it is useful to put them all under one directory (“folder”). I recommend you create a directory called cs112, in your home directory.
From your Coder webpage, click the Terminal Window. Then type this:
mkdir cs112To change your current working directory to cs112, do this:
cd cs112To verify what is your current directory, do this:
pwdYou should be in the /home/<username>/cs112 directory, where <username> is your own Calvin username.
For this course, we will store all our code in the cs112 directory, and it will be up to you to make a clone in your sample labs and project directories for each lab and assignment.
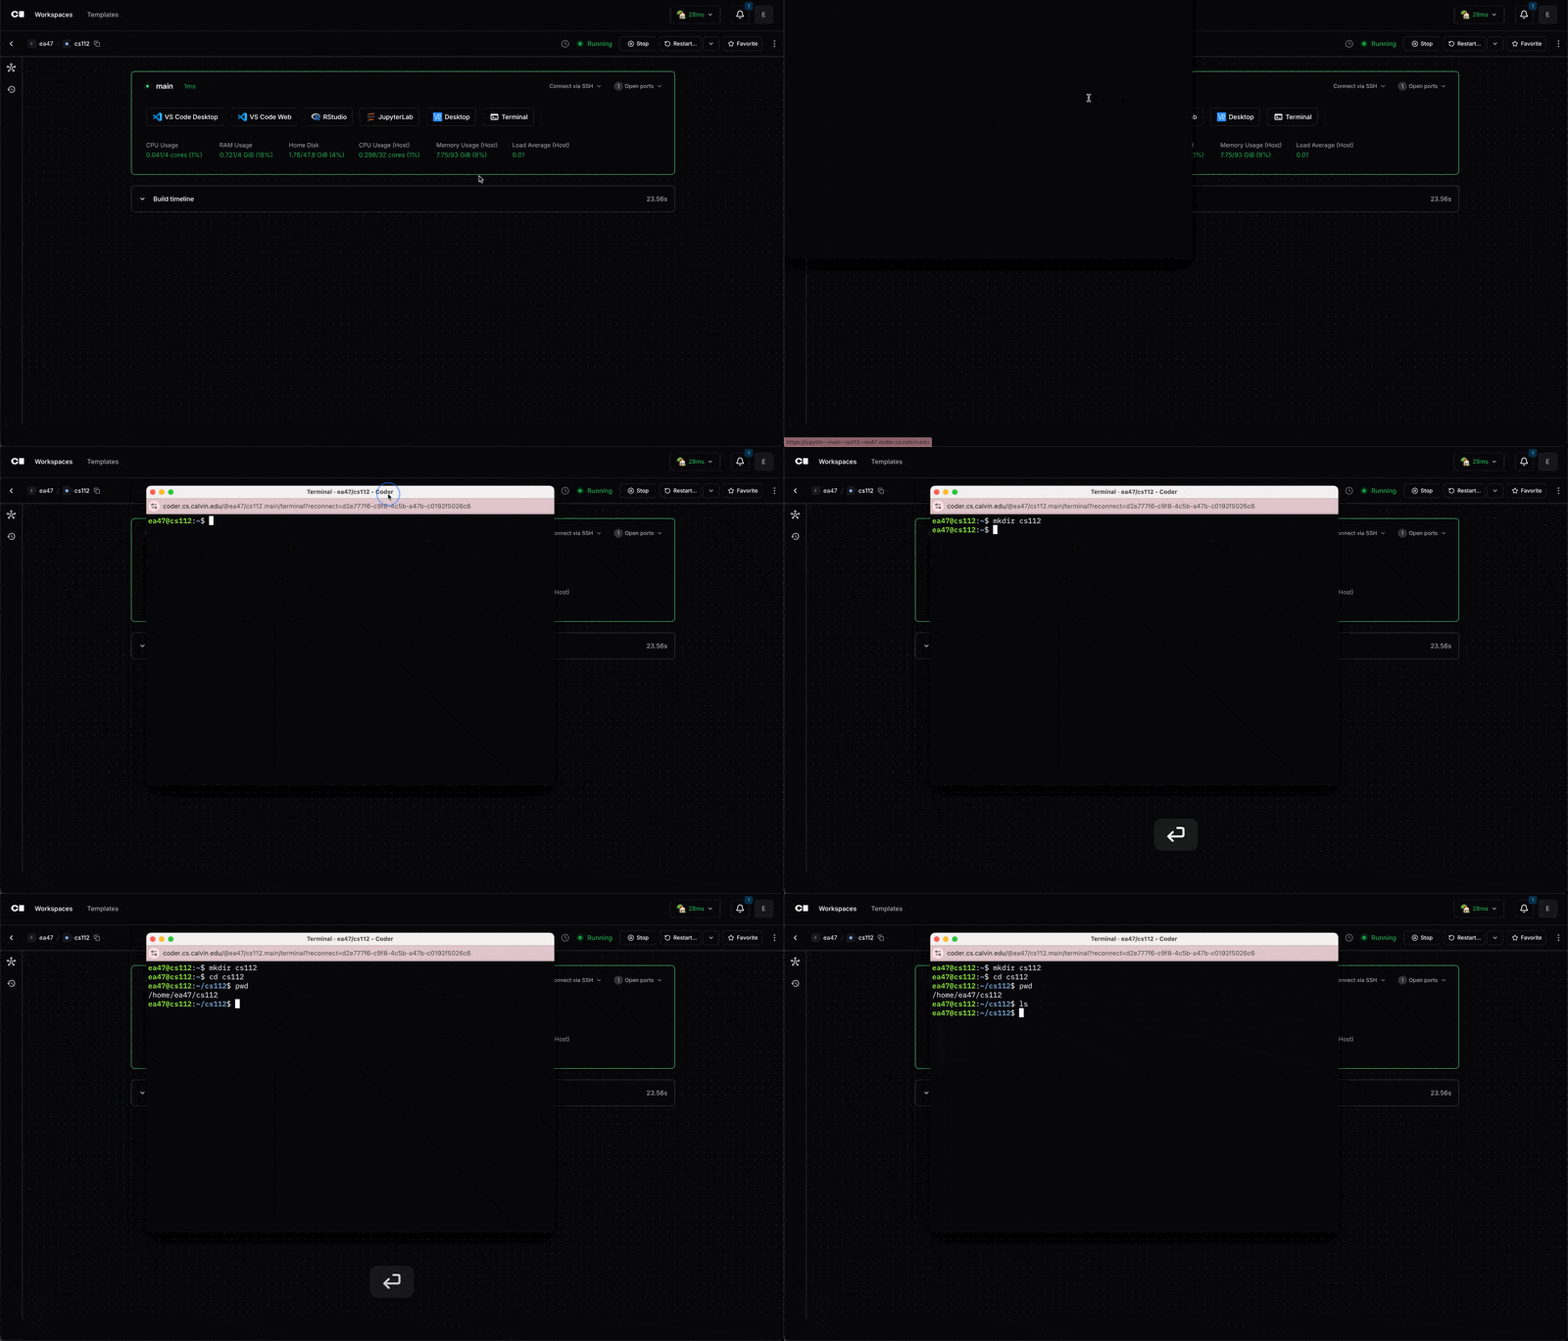
How to create a directory in the terminal.
At this point, you can close the Terminal window.
5. Installing and Launching VS Code
As mentioned earlier, we will use Visual Studio Code, more commonly known as VS Code, as our integrated development environment (IDE) for this class. You will need to install VS Code on your own machine.
Visit https://
code .visualstudio .com and download and install the software on your machine. This step will vary based off of what type of laptop you have. Your instructer or lab assistant may be able to assist here, but please try to do this yourself first. Open VS Code on your own machine.
While we will be running the VS Code IDE on our own devices, to develop our C++ code we will connect remotely to the Calvin Linux resources offered by Coder.
Change the Coder webpage you had open earlier. Find the “VS Code Desktop” button and click it. Open the link!
When prompted to install the “Coder” extension into VS Code, accept the prompt. This adds the offical Code extension into your local VS Code software and allows a remote encrypted connection into your Calvin CS Linux resources — including the C++ compilers we need for this class.
VS Code will attempt to connect to your Coder workspace. You will be prompted to select the platform for the remote host, so choose “Linux”.
Once connected, you will have an option to “Open Folder”. Browse to or type the following:
/home/<username>/cs112where<username>is your username. Example:/home/jcalvin/cs112/lab00. Click OK.If prompted to trust the authors of the files in this folder, select “Yes, I trust the authors”. After all - the author is going to be you!
Lastly, within VS Code, go to the Terminal menu and select “New Terminal”. You should see a Terminal window appear at the bottom of your screen - identical to function as the Terminal we used on the Coder website before!
At this point, you are ready to get our initial code and start coding. Continue on.
6. Create your GitHub Account
GitHub is a web service where all your code for this course will be stored. Graders will be able to go to your code and see it and grade it. Additionally, you’ll be able to access your code from any machine — the lab machines or your personal machine — as long as you submit your code to your repository.
If you do not already have a GitHub account, you should go to https://github.com and create a new account. I would prefer it if you would use your Calvin email address here. After getting a verification code via email and verifying your account, the website asks you what kind of features you will be using. At the bottom of this page it says “Skip Personalization”. Just click that to skip all the personalization stuff. You will likely need to set up two factor authentication - 2FA - as part of this process. If you have good texting capabilities in the CS computer labs, you can use the SMS text option for 2FA authentication.
Keep your github.com web page open in the browser for the next step.
Creating a Project
Each lab and homework will contain a link to a GitHub Classroom assignment invitation. The lab or homework will give you instructions on how to accept the invitation and then download the code for that assignment.
When you click on the link, a repository for you will be created. The webpage will give you instructions on how to see that repository. The webpage for your repo will look something like this: https://github.com/24SP-CS112/lab00-yourgithubteam (Note: this URL doesn’t exist! It is just an example to show you what your repo URL will look like.)
Go to the webpage for your repository. You will need to get the ID of the repo. To get this, you click on the button <> Code, then click on the SSH tab. Then click on the two boxes to the right of where it says git@github.com:.... This copies your repo id to your clipboard.
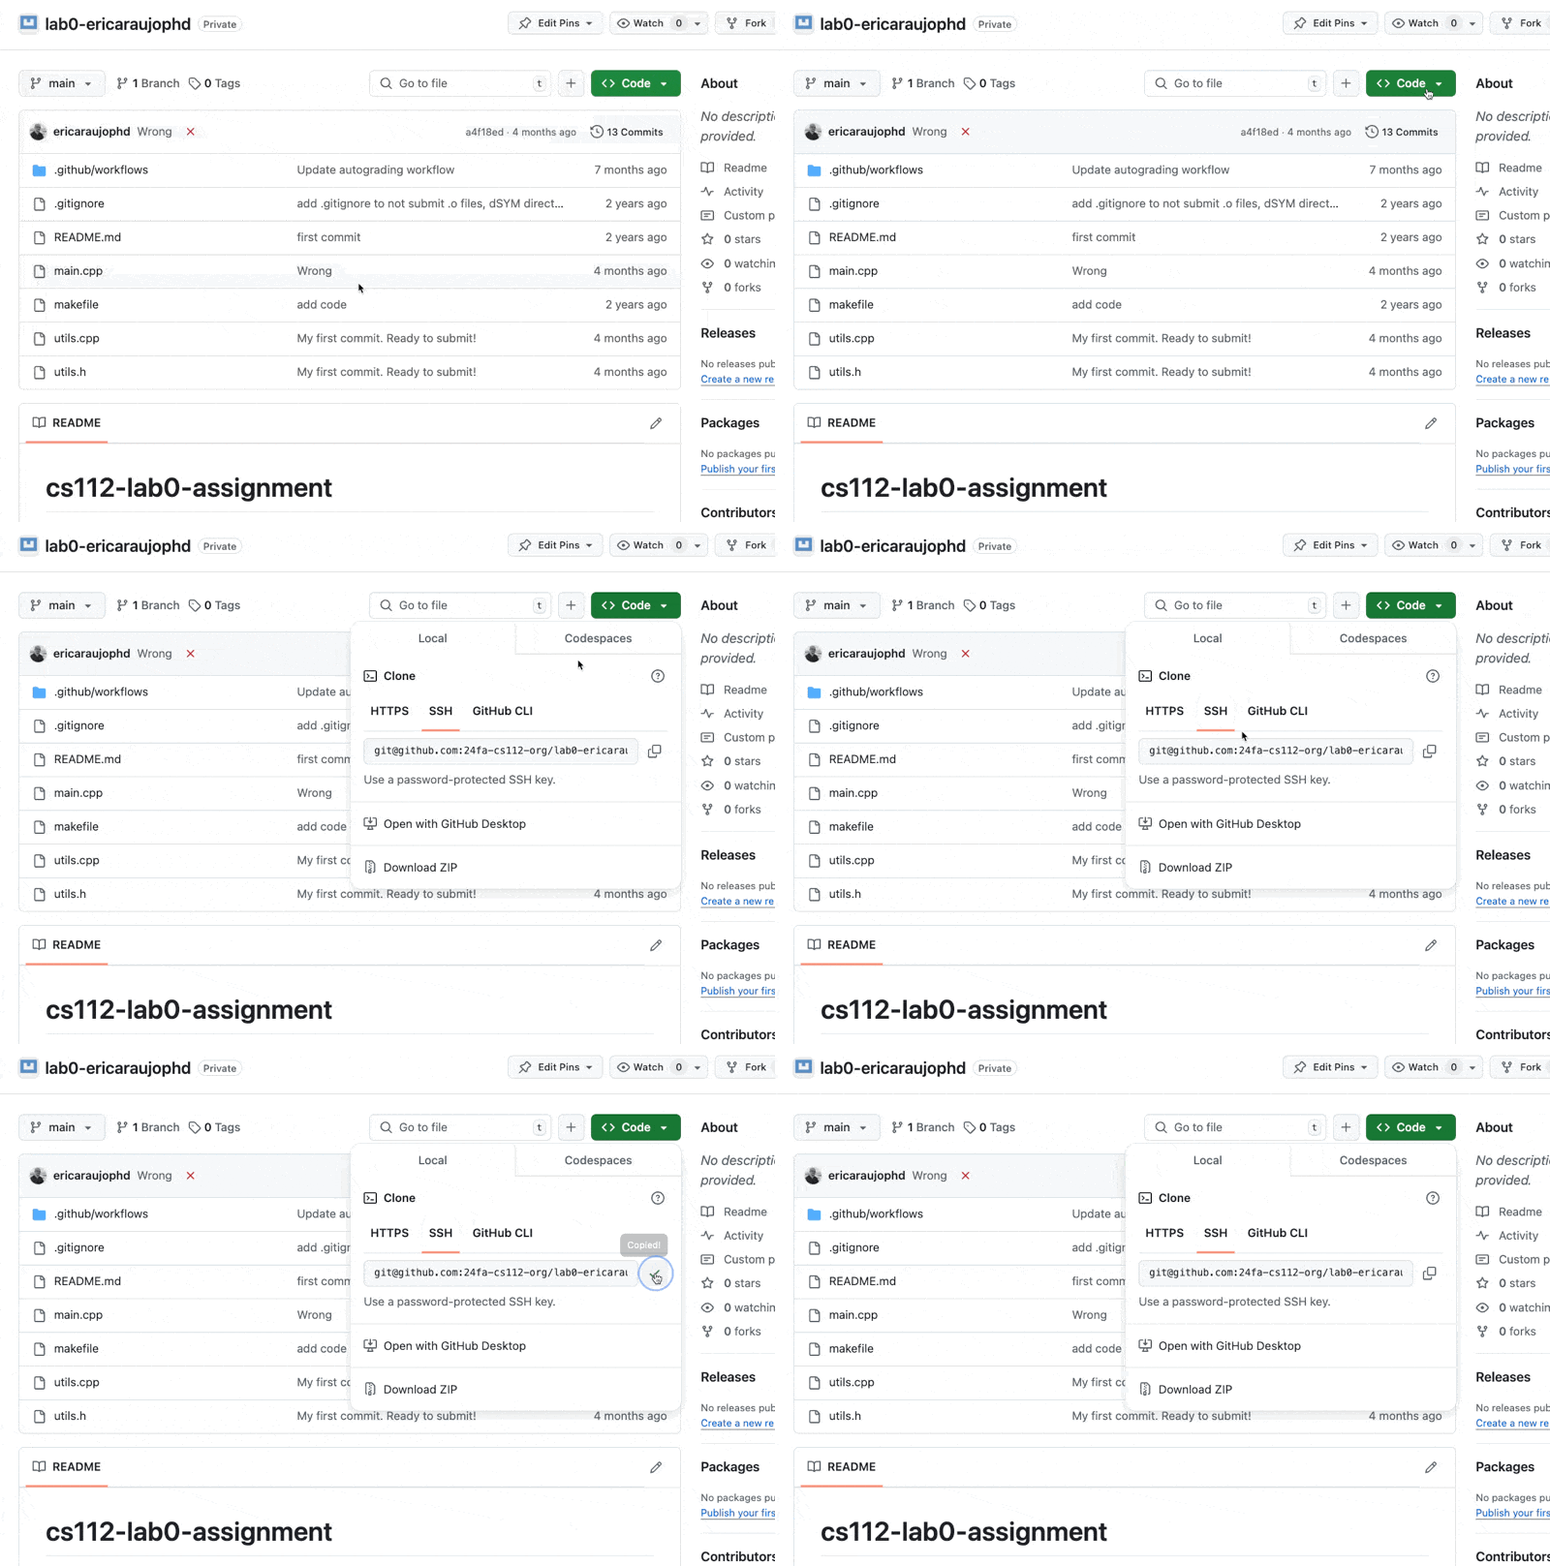
Cloning the git repository
(Keep this tab open in your browser — you’ll need it later in the lab.)
The instructions in each assignment will remind you what to do:
Open a terminal (it could be the terminal from Linux or you can use the terminal from VS Code by typing Ctr + Shift + `).
pwdIf you aren’t already in your cs112 directory, then do:
cd cs112Finally, do this command, substituting <your-github-repo-url-here> with the URL without the <>s.
git clone <your-github-repo-url-here>If you get prompted to access the github.com fingerprint, type: yes
When you do this, git clone <your-github-repo-url-here> will download your repo to your cs112 directory, into a directory called lab0-yourgithubaccount (where yourgithubaccount is actually your github account name).
Read the output from your command. You will notice that it didn’t work! In order to use Github with Coder we need to setup something called a SSH public key within Github. Coder has generated one for you, and if you look in your terminal window, you will see a line that looks something like this:
ssh-ed25519 AAAAC3NzaC1lZD1235st+gjhagr....Creating SSH Key Pair
Github security now requires that you use an SSH Key Pair. An SSH key pair is two numbers—a public key and a private key—stored in two files. The public key can be shared publicly, but the private key should not be shared. Coder does this automatically for you.
You will need to copy the bottom of the output you saw from above into github. To copy that output, select it with your mouse, and either do Ctrl+Shift+c or choose Edit -> Copy from the menu. Do that now.
Now, go to your github.com account in the browser. You will need to go to this page https://
Click the New SSH Key button in the upper right. Choose a Title: CS112 works well. Then paste the key you copied earlier into the Key textbox. Click the Add SSH Key button.
Creating a Project - Second Attempt
We should be all ready to try our clone attempt again. Return to your terminal and repeat the last command.
git clone <your-github-repo-url-here>This time is should work correctly. To verify, in the terminal do the following:
ls This will show you the name of the directory containing the lab0 code.
cd into that directory, using the directory name you saw as the output of the ls command:
cd lab-00-<nameofgithubrepo>
ls
This will show you what files have been installed for you for this lab. Switch back over to your VS Code, and see if you see the lab-00 directory there!
7. Customizing VS Code
VS Code has tons of features. We will configure only a few of them at this point.
First, let’s install the C++ extensions. In the menu bar of VS Code, select File -> Open Folder. Choose the directory that you downloaded when you did git clone above. That directory will be under your cs112 directory. Next, open the main.cpp file. When you open that file VS Code is going to suggest (in the lower-right corner) that you install some extensions to help you work with C++ files. The extension that you want to install is called the C/C++ Extension Pack. Select that and install it.
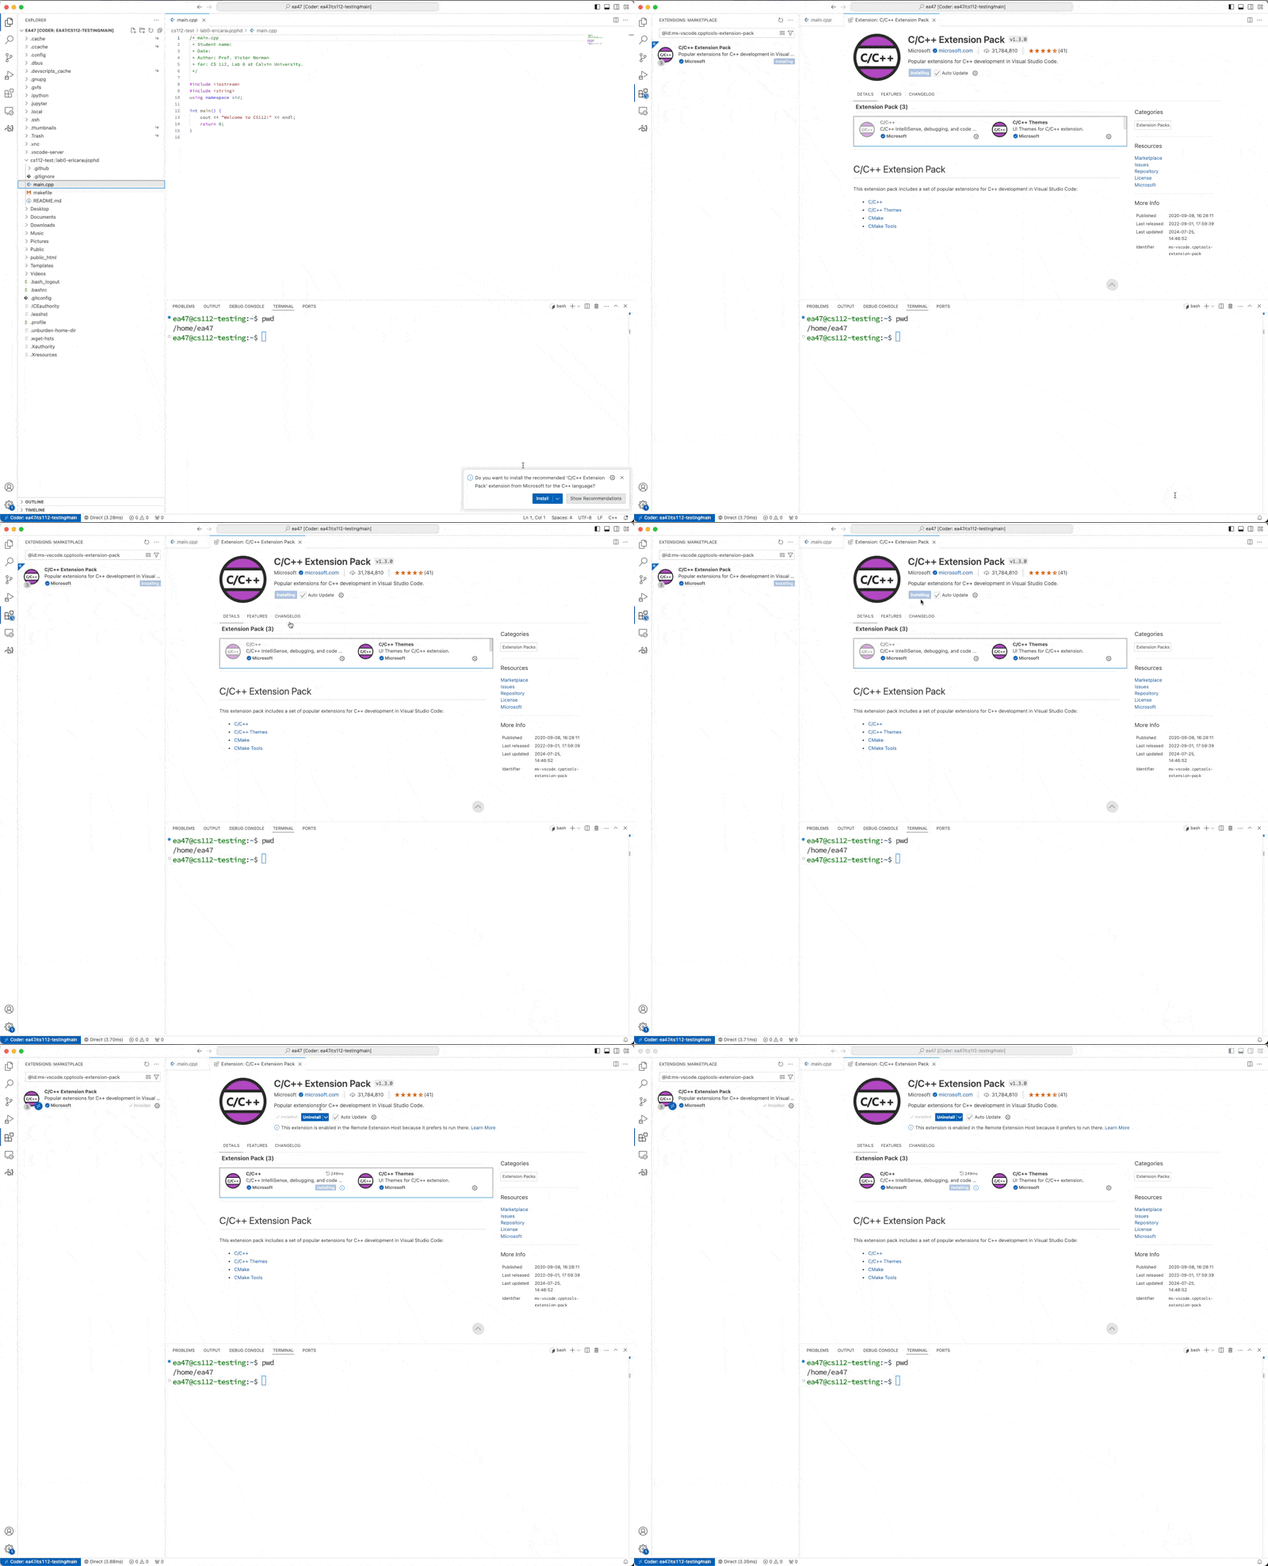
Installing C/C++ Extension Pack in VS Code
Go to your VS Code window. Hit the F1 key, which should open the Command Palette at the top of the window. Start typing Preferences:
When you see Preferences: Open User Settings appear, select it. On the resulting page there is a search bar at the top. In the search bar, type Auto Save. You should see a control appear labeled Files: Auto Save. From the dropdown menu, select onFocusChange. This will make sure that your files are automatically saved any time you select another file or another window. No more remembering to save!!
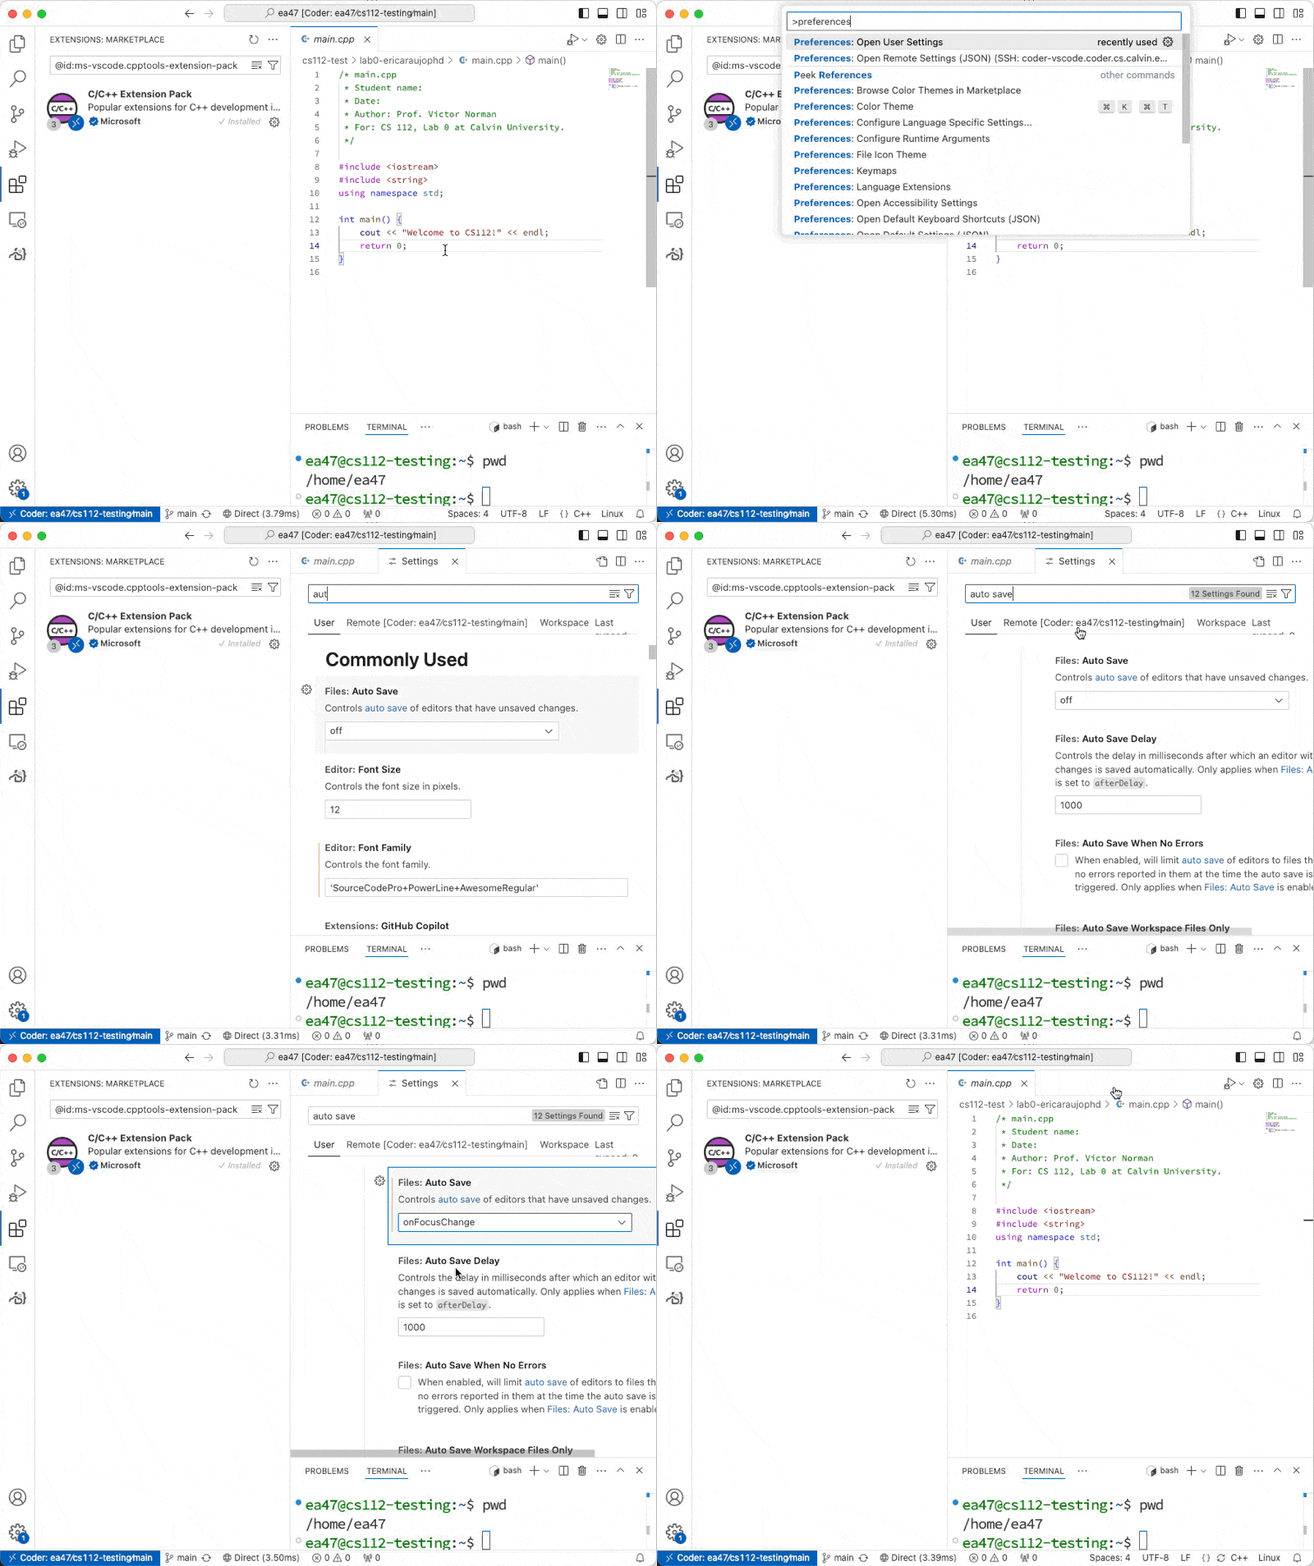
Changing Auto Save setting in VS Code
Don’t close the Settings page yet! Instead, erase where you typed Auto Save, and now search for Tab Size. You should see a control called Editor: Tab Size. Set this value to 4.
Now, erase Tab Size so that you are not searching for anything.
Under Extensions, you should see a C/C++ section. Select that, and then Formatting as shown below.
Scroll down until you see C_Cpp: Clang_format_style. Replace whatever you find in the input box with this:
{ BasedOnStyle: Google, IndentWidth: 4, AccessModifierOffset: -4, AllowShortFunctionsOnASingleLine: InlineOnly }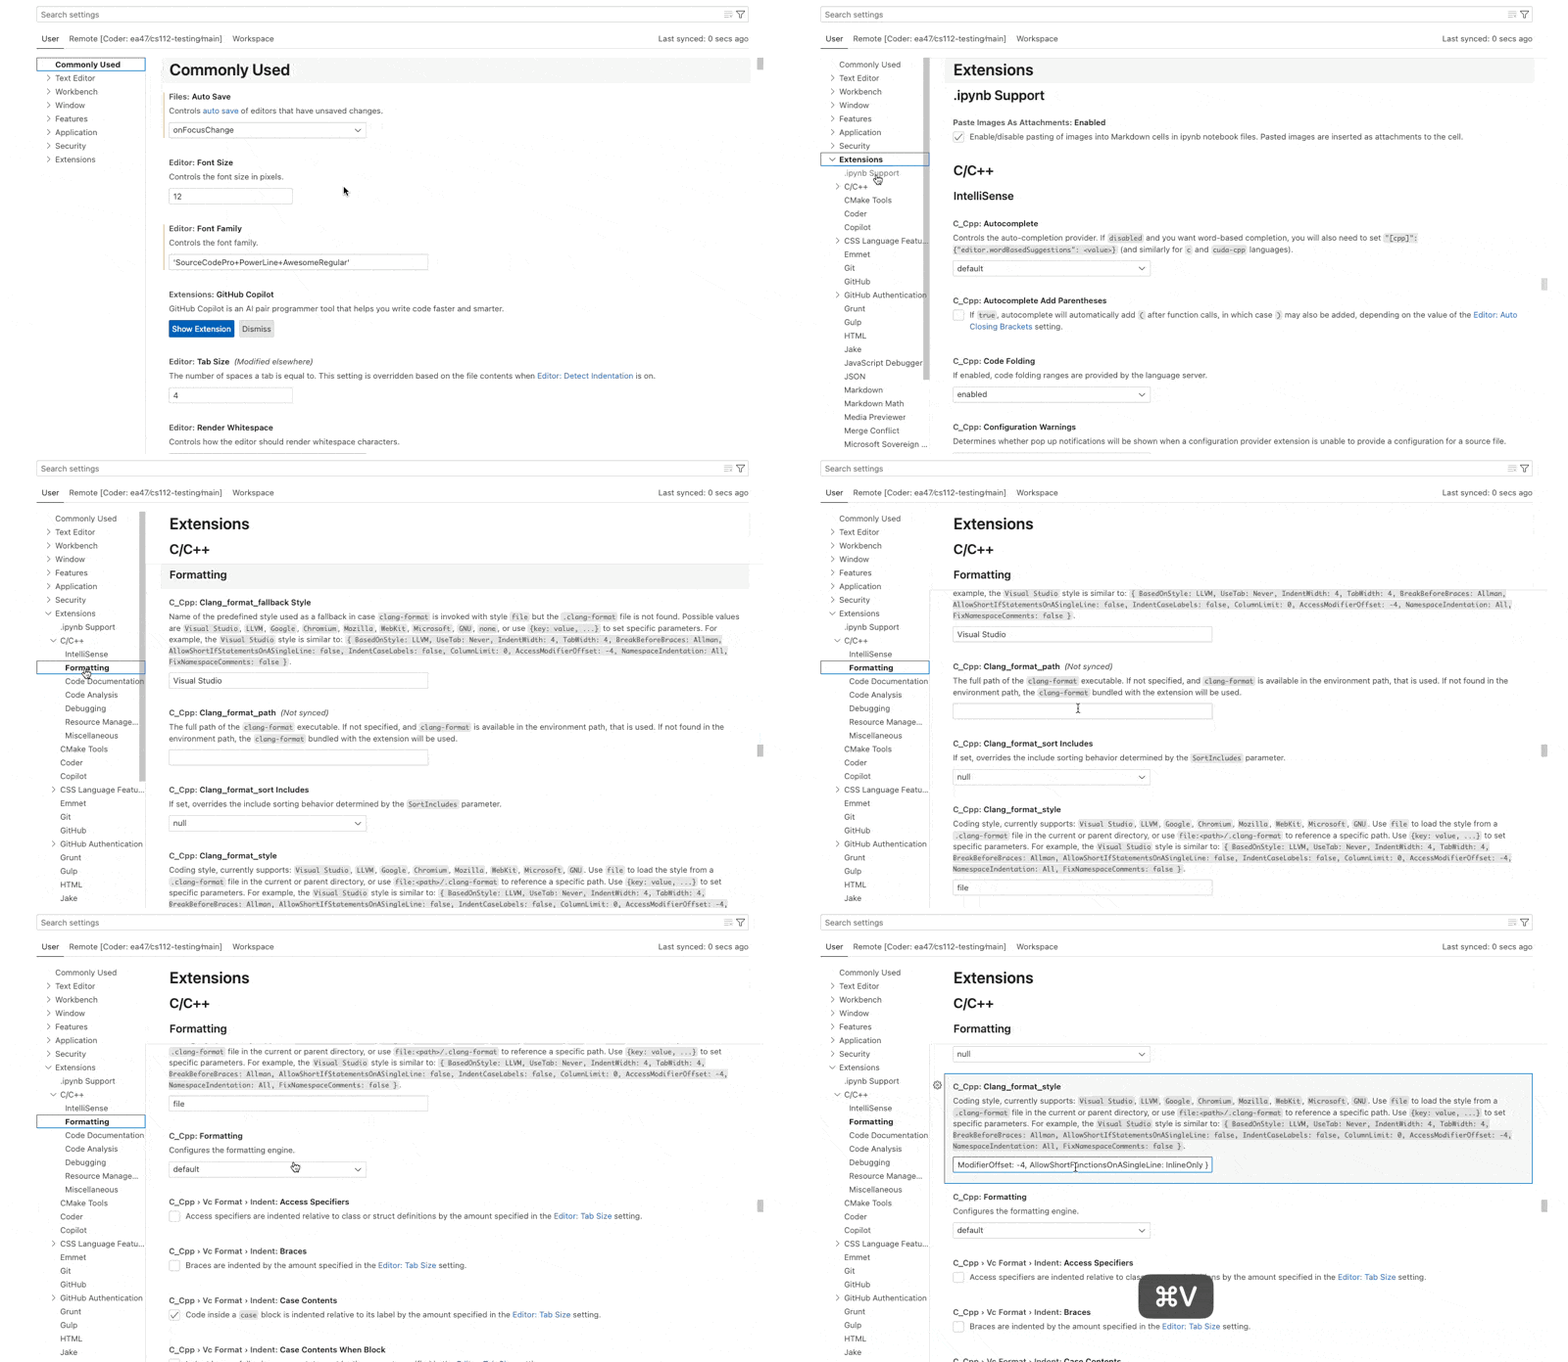
Changing C/C++ settings in VS Code
You can close the Settings window now.
The last step we will take is fixing the red-underlined C++ lines of code. To do this, we need to set the default C++ Intellisense configuration. Do this:
From the “Help” menu, select “Show All Commands” or push the keyboard combo of Ctrl+Shift+P. In the search bar, search for “Select Intellisense Configuration”. This should show you something that looks like “C/C++: Select Intellisense Configuration”. In the following menu, you will be prompted to select which compiler you want to use. We want to use: Use g++ (found in /usr/bin)
After this, you are done!
8. Compiling your Program
Take a look at your main.cpp file. It should look like this:
/* main.cpp
 * Author: Prof. Victor Norman
 * For: CS 112, Lab 0 at Calvin University.
 */

#include <iostream>
#include <string>
using namespace std;

int main() {
    cout << "Welcome to CS112!" << endl;
    return 0;
}
Go back to your Terminal window. Make sure you are in the directory where your code is. You can confirm this by typing pwd and/or type ls to list the files in the current working directory. You should see that you are in cs112/lab0-yourgithubaccount, and that there is a file called makefile there.
To compile your program, type make. This command reads your makefile, which gives instructions on how to build your program. When the build succeeds, do ls again to see that now there is a file called lab0. This is your executable that you just built.
9. Running Your Program
To run the executable, in the terminal, type
./lab0 This is telling the terminal shell to run the lab0 executable that is in this directory.
10. Practice Writing Code
In main.cpp, select all the code and delete it. Then, rewrite the code so that it prints out Welcome to CS112 and C++!. Don’t cheat! Practice makes perfect. If you can’t figure out why you are seeing an error, collaborate with your neighbor. Remember you have to compile your program each time before you try to execute it.
In your
main(), define a variable name of type string, and initialize it to your name by asking for an input from the keyboard (take a look at the cin command in C++). When you run your executable, it will be waiting for you to type your name and hit Enter!
string name;
cin >> name;Change main, so that it now prints out
Welcome to CS112 and C++, your name here!using the variable. To do this, use multiple << operators, similar to this:
cout << "Welcome" << aVariable << endl;Make sure you put the exclamation point on the end. Now, try recompiling and running
./lab0Now, create a second file called utils.cpp and in there, put this code:
 int courseNumber() {
  return 112;
}
Then, create a file called utils.h and in there, put this code:
int courseNumber();In your main.cpp file, add
#include "utils.h"to the area where you have #include <iostream>.
Now, in your code in main(), instead of hard-coding 112 in your output, call the function courseNumber() to get the course number.
Compile your project, fix any problems the compiler finds, and run your project. When you have your code working (i.e., the output looks identical to what you had after step 2 above), go on.
Submitting your Code for Grading
When you push your changes to your online repo, a set of automated tests may be run (for most labs and projects). To find out if your automated tests passed, look at your online repo. If you see a green checkmark, tests have passed! But, in mine, I see this:

Test didn’t pass!
If I click on the red ❌, I see this:
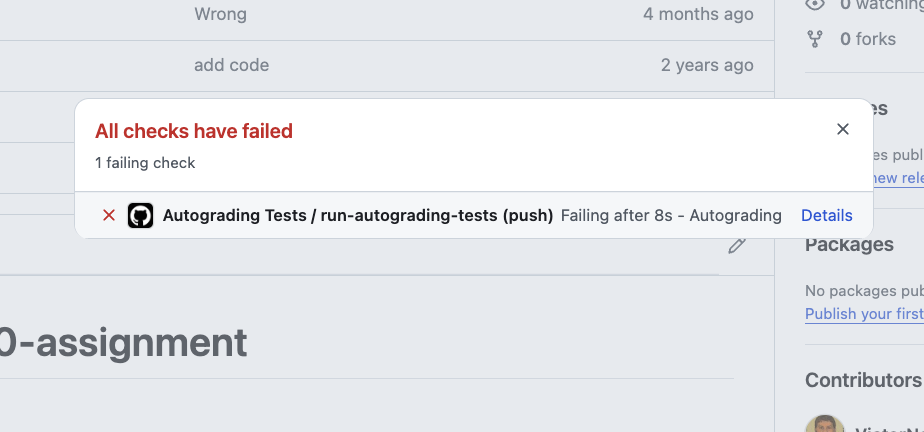
To see the steps to get your errors report, see video below.
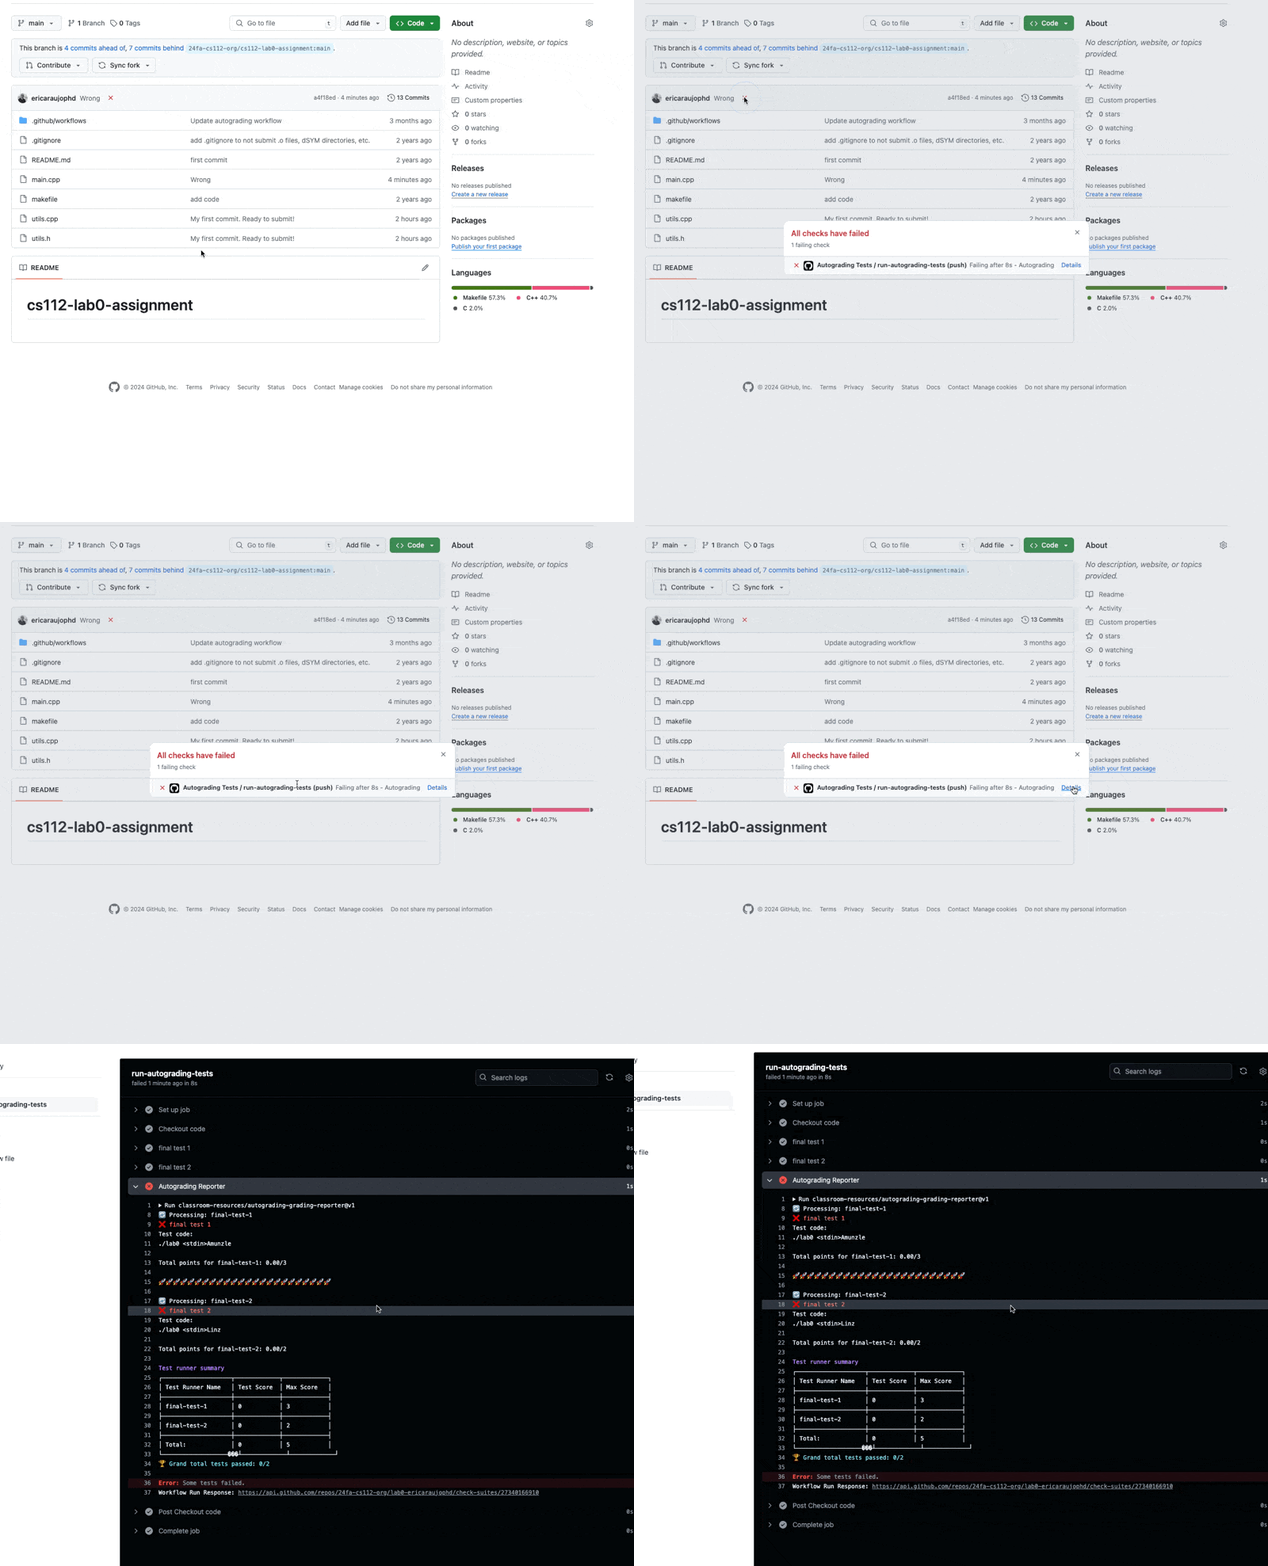
Click on Details to see information about what automated test failed. In this case, there is only 1 automated test, so if it fails your output is not what is expected.
If your code is not passing, make sure the output exactly matches those tests, including spaces -- there is a space after "C++, ". Also make sure the autograder can receive an input command to enter your name. In the autograding test, the name Amunzle is given as input to the program, so the test expects this as output:
Welcome to CS112 and C++, Amunzle!If you have problems, you should go back and fix them, and then resubmit until the automated test passes. When you are done, you are free to go. Be sure to logout from your workstation, so that no one plays any pranks with your account!
Grading Rubric
10 points total
code compiles and passes autograder tests: 5 pts.
code is clean and neat: 2 pts.
miscellaneous (see below for examples): 3 pts.
Ways students have lost points in the past:
-1: No implementation for
courseNumber()-1: No call to
courseNumber()inmain()-2: No variable to display your name
-1: Implementation for
courseNumber()should be in utils.cpp, not the header file utils.h.-1: Good, but please format your code!