Getting Started
Finish this before your first lab, on Tuesday, September 1.
It does not count toward your grade. It exists so that you walk into that lab with your tools already set up and working, instead of spending the session installing things. If you get stuck, post on Moodle or email me at eric.araujo@calvin.edu. I would far rather hear from you now than have you arrive on the first day stuck.
It is still submitted and checked like every other CS112 assignment, so you will see a score once you push. That score is practice, not part of your final grade.
Plan to set aside about 1.5 to 2 hours. Most of that time goes to the one-time setup of Coder, VS Code, and GitHub. Once those are done, they’re done for the whole semester. The actual coding at the end is short.
Objectives
By the end of this assignment, you will be able to:
- Log in to Coder and work in a Linux terminal.
- Connect VS Code on your laptop to Calvin’s Linux environment.
- Set up your GitHub account and get your first CS112 repository.
- Clone your repository and open it in VS Code.
- Compile and run a C++ program with
make, and explain what compiling does. - Write basic C++ statements with variables, keyboard input, screen output, and a function call.
- Push your completed work to GitHub.
1. Introduction
Welcome to CS112!
You arrive in this course from different places. Some of you took CS108 and wrote Python. Some of you took AP Computer Science and wrote Java. Some of you have written a bit of everything. C++ will be new to most of you, and that is fine, because we start from the beginning.
The one thing C++ asks of you that a Python course did not is compiling. Before a C++ program can run, it must be translated from the source code you write into machine instructions the CPU executes directly. That extra step buys you direct control over memory, and the speed that comes with it. This course is about that control. If you have written Java, this idea is already familiar.
In this course, we will write C++ using Visual Studio Code (VS Code) as our editor, but we will run and compile our programs on Calvin’s Linux servers through a service called Coder. This means your editor lives on your laptop, but the C++ compiler and your files live on the server.
Four things about C++ before you write a line of it:
| C++ | |
|---|---|
| How you run it | compile first, then ./a00 |
| Variable types | you declare them yourself |
| End of a statement | a semicolon ; |
| Grouping code | curly braces { } |
If you are coming from Java, all four will look familiar. If you are coming from Python, the first three are the adjustment, and this assignment walks you through each one.
a00 in that first row is this assignment’s short name. It is also what your repository and your compiled program are called, so you will see it a lot from Step 9 onward.
By the end of this assignment you will have finished a small program called the CS112 Oracle. It asks your name, how nervous you are about the course, and the month you were born, and then prints your fortune. The function that chooses the fortune is already written for you. Your job is the part that talks to the person at the keyboard.
2. Create Your GitHub Account and Send Me Your Username
Do this first, before anything else on this page.
Everything else in CS112 depends on it, and it is the one step that needs me to act. I add each student to the course organization by hand, and I may not get to it for a day. Submit it now, then carry on with the rest of this assignment while you wait. Nothing between here and Step 9 needs your GitHub account to be ready.
GitHub is where all your CS112 code will live. Every assignment is handed to you as a private repository, you push your work there, and it is checked automatically. It also means you can reach your work from any machine.
If you already have a GitHub account, use it. Do not make a second one for this course. Add your Calvin address to it, Settings → Emails → Add email address, so that the account and the roster agree, and send me that account’s username below.
If you do not have an account yet:
- Go to https://github.com and sign up. Use your Calvin email address.
- Choose your username carefully. It is public, it appears in every repository URL, and it is the first thing an internship recruiter sees when you send them a link. Something close to your real name works; something you would not want to read aloud in an interview does not. You are stuck with it for the semester either way.
- Complete the email verification, then set up two-factor authentication when GitHub asks, it is required for anyone who pushes code.
Save your 2FA recovery codes somewhere you will still have them in December.
GitHub shows them once, during setup. If you set up two-factor authentication on a phone and then lose the phone, those codes are the only way back into your account, and your account is where all your CS112 work lives. Download them, and put the file somewhere that is not the phone.
This is the one setup step on this page that can cost you a whole semester of work, and it takes about thirty seconds.
Then send me your username. I create a private repository for you, one per assignment, from the class roster, and that roster is built by hand from the usernames students send in. Nothing is created for you until yours is on it.
The form asks for your Calvin email address, your name, your lab section, and your GitHub username. Send the username itself, the one that appears in https://github.com/<username>, not your email address and not your display name. Open https://github.com/<your-username> in a browser first and check that your own profile loads, because a username that does not exist cannot be invited.
Once you have submitted, do not change or delete your GitHub username. Your repositories, your submissions, and your grades are all tied to it for the whole semester. Renaming your account mid-course breaks the link between you and your work, and untangling it is manual for both of us.
What happens next. I check the form and add you to the course organization by hand, usually within a day. GitHub then emails you an invitation to join 26fa-cs112. Accept it, that is the whole of your part, and it takes one click.
You will know it worked when github.com/26fa-cs112 loads an organization page instead of “page not found”. Your repository for this assignment appears there once I create it, and Step 9 picks up from that point.
If two days pass with no invitation, email me. That is far more likely to be a typo in a username than anything you did wrong.
The invitation expires after 7 days. If it lapses, or you never see it, email me and I will send another. Do not create a second GitHub account.
Two things that trip people up:
- Check spam and Gmail’s Promotions tab. The subject is “@ericaraujophd has invited you to join the @26fa-cs112 organization”.
- If the link shows a 404 page, you are signed in to the wrong GitHub account. This is by far the most common problem. Sign out, sign back in as the username you sent me, then go to github.com/26fa-cs112 and accept there.
Now keep going. The rest of this page sets up the tools you will use, and none of it has to wait on me.
3. Using Linux
All your CS112 work will run on a Linux server, and you will drive it from a terminal, a window where you type commands instead of clicking.
If that sounds like a step backwards, consider where Linux actually runs. Almost every web server on the internet. The machines that build and test code at every company you might intern for. Research clusters, supercomputers, the Mars helicopter, and the phone in your pocket if it is an Android. Most of those machines have no screen and no mouse attached, so typing commands is the only way to use them.
For you, this semester, that means your compiler lives on that server. Every time you build a program, run it, or submit it, you will type a command. By December it will be muscle memory, and you will have a skill that transfers to every machine you touch for the rest of your career.
Here is what one looks like, and what the pieces of it mean:
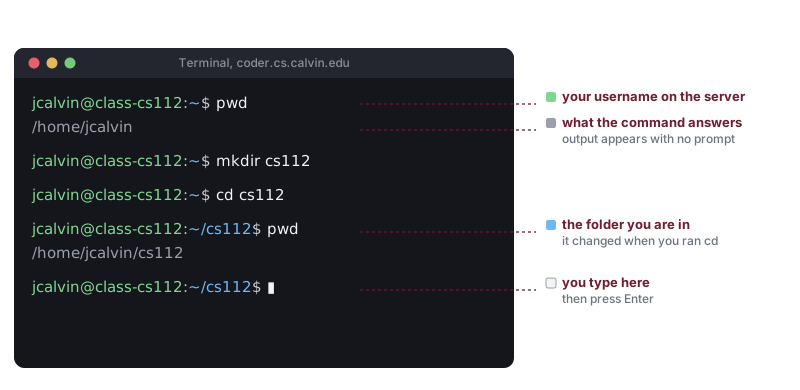
$.
The line you type on is called the prompt. Before you type anything, it tells you who you are and which folder you are currently sitting in. When you move to a different folder, the prompt changes with you.
You do not need to memorize anything yet. Step 6 walks you through each of these commands as you type it, once you have a terminal open.
If you want to go deeper on your own time, Ubuntu’s command-line tutorial is a good free resource.
4. Coder
The Calvin CS Department provides a service called Coder that gives you access to a Linux environment and a C++ compiler. You do not need to install a compiler on your own laptop. Coder handles that.
Do this:
- Open https://coder.cs.calvin.edu in your browser.
- Sign in using your full Calvin email address (e.g.,
jcalvin@calvin.edu). - Click New Workspace → Calvin CS Linux. That is the only template we use this semester.
- Name it
class-cs112. Leave all other options at their defaults. Click Create Workspace. - Wait a few seconds for your workspace to start. Leave this browser tab open, because Step 5 sends you back to it.
If any part of this does not work, email me immediately: eric.araujo@calvin.edu.
I mean it. Do not spend an hour fighting it, and do not decide to deal with it later. Coder is the one step where being stuck means you cannot do anything else on this page, and when it fails it is almost always something on the department’s end rather than something you did. Tell me what you see, and include a screenshot if you can.
Your workspace stops when you are not using it, and that is normal.
Coder shuts an idle workspace down to free up resources for everyone else, so when you come back the next day it may say Stopped. Press Start, wait a few seconds, and you are back exactly where you left off.
Your files are safe. Your home folder on the server survives stops, restarts, and the entire semester. Stopping a workspace is like closing a laptop lid, not like erasing a disk.
Once you reach Step 13 you get a second layer of safety: anything you have pushed to GitHub also exists there, independently of Coder.
5. Installing and Connecting VS Code
We will edit code on your laptop using VS Code, but compile and run it on the Linux server through Coder.
First, install VS Code on your laptop
- Go to https://code.visualstudio.com and download VS Code for your operating system. Install it.
- Open VS Code.
Then connect VS Code to Coder
- Return to the Coder browser tab. Your workspace row has four small buttons on the right. Click the first one, VS Code Desktop.

Do not click “Open Desktop” (the third button). It opens a remote desktop, not VS Code, and it is the one students click by mistake. The button you want is the leftmost, and hovering over it shows Open VSCode.
- When VS Code asks if you want to install the Coder extension, accept. This allows VS Code on your laptop to reach the compiler on the server.
- If VS Code asks you to select the platform for the remote host, choose Linux. It may not ask, in which case skip this.
- If asked to trust the authors, select Yes, I trust the authors. (You are the author.)
- Open your home folder on the server: File → Open Folder. VS Code offers a path that is already
/home/followed by your Calvin username, that is the one you want, so press OK. Trust the authors again if asked. - Open a terminal inside VS Code: Terminal menu → New Terminal. A terminal appears at the bottom of the window.
Your home folder is where everything you do this semester lives, so opening it now means the file list on the left shows your work, and any terminal you open starts in the right place. In the next step you will make a folder inside it for this course.
Shortcut: In VS Code, press Ctrl+` to open (or toggle) the integrated terminal. On some keyboard layouts, if the backtick key is awkward to find, use Terminal menu → New Terminal instead.
That terminal is the same machine you saw in the Coder browser tab. Not a copy, not your laptop: the very same Linux server, reached a different way. A file you create in one appears in the other. From here on, use the terminal inside VS Code, because your editor and your commands are then in one window.
6. Your First Commands, and Where to Store Your Work
You will have many assignments in CS112, so let us make one folder to keep them all in. You will learn the commands by using them.
class-cs112 and cs112 are two different things.
class-cs112 is your workspace: the Linux computer itself, the one you start and stop from the Coder dashboard.
cs112 is a folder on that computer, which you are about to create. It is where your coursework will live.
Use the terminal you just opened inside VS Code. Click in it, and it is waiting for you to type.
Type the commands. Do not paste them.
Every code block on this site has a small copy button in its corner, and for the rest of your life it will be the sensible thing to use. For the next few weeks it is not.
Typing mkdir cs112 yourself is how mkdir stops being a word on a webpage and becomes something your hands know. Pasting it produces the same folder and teaches you nothing, and the difference shows up the first time you are away from this page and have to write the command from memory, which is roughly every day after this one.
Typing also makes you read. Paste a command and your eyes skip it; type it and you notice that cd .. has a space before the dots, that ls is two letters and not Is, and that the $ at the start of a line in a book is the prompt, not part of the command. Those are the mistakes that eat an afternoon, and typing is how you stop making them.
You will get things wrong. An error message you caused is the cheapest lesson available, and the terminal is patient. Press the Up arrow, fix the typo, press Enter.
There are fair exceptions, and the page will tell you when you have reached one: long one-off strings where a typo costs you time and teaches you nothing. The formatting setting in Step 7 is one, and it says so. Your repository address in Step 9 is another. Everything short enough to type, type.
Where am I? Type this and press Enter:
pwdpwd stands for print working directory. It tells you where you are right now, and it is the first thing to type when you are lost. You should see /home/ followed by your username, for example /home/jcalvin.
That is your username on the server. Note it down, because this page asks for it twice more. It is also the first thing in your prompt, the part before the @. If your prompt reads jcalvin@class-cs112:~$, your username is jcalvin and your home folder is /home/jcalvin.
What is here?
lsls lists the files and folders in the current directory. Your account starts with a handful of folders already in it:
Desktop Documents Downloads Music Pictures Public public_html Templates VideosThose come with the account and you can ignore all of them. You are about to add one of your own.
Make a folder for the course:
mkdir cs112mkdir makes a directory. Run ls again and you will see cs112 appear alongside the folders that were already there.
If it answers mkdir: cannot create directory 'cs112': File exists, you already have one, which is fine. Carry on to the next command.
Go into it:
cd cs112cd changes directory. Confirm it worked:
pwdYou should now see /home/<username>/cs112, where <username> is your Calvin username. Every assignment you clone this semester will live inside this folder.
To go back up one level, use two dots:
cd ..Run cd cs112 again before moving on, so you finish this step inside the course folder.
Two habits that will save you hours
Press Tab instead of typing. Type the first few letters of a file or folder name and press the Tab key. Linux completes the rest for you. If nothing happens, either the name does not exist or more than one thing starts with those letters, in which case pressing Tab twice lists the candidates.
This matters more than it sounds. In Step 9 you will change into a folder called something like cs112-a00-jcalvin1837. Typing cd cs112 then pressing Tab is faster than typing it out, and it cannot produce a typo. Most “no such file or directory” errors in this course are typos in a name that Tab would have completed correctly.
Press the Up arrow to repeat a command. Your last commands are remembered. Up arrow walks back through them, and Enter runs the one you land on. You will run make and ./a00 over and over while debugging, and Up-Up-Enter beats retyping every time.
The rest of the commands you will need
You have now used five commands. Here is the full set for the semester, so you have one place to look them up:
| Command | What it does |
|---|---|
pwd |
Print working directory: where am I? |
ls |
List the files and folders here |
ls -a |
List all of them, including hidden files (see below) |
cd folder |
Change directory: go into folder |
cd .. |
Go up one level |
cd |
With nothing after it, go straight back to your home folder |
mkdir folder |
Make a new directory |
cat file |
Print the contents of a file to the screen |
echo text |
Print text back to the screen |
command > file |
Send output into file instead of to the screen |
rm file |
Remove a file. See the warning below |
Remember cd on its own. However lost you get, typing cd and pressing Enter puts you back at /home/<username>, and you can start again from there.
Three more you will meet later in this assignment, explained where they appear: git (Step 9), make (Step 11), and ./a00 to run your compiled program (Step 11).
rm does not use a trash can. There is no undo and no Recycle Bin on a Linux server. A file you rm is gone. Read the line twice before you press Enter, and never run rm with a * in it unless you are certain what it matches.
Try cat and rm once, on a file that does not matter. Make one:
echo "hello from CS112" > scratch.txtOn its own, echo would print that sentence straight back at you. The > redirects it into a file instead, so nothing appears on screen. Read it back:
cat scratch.txtcat prints a file’s contents to the screen. It is how you glance at a short file without opening an editor. Run ls and you will see scratch.txt sitting in your folder. Now delete it:
rm scratch.txtRun ls once more. It is gone, and there is nowhere to go looking for it. Better to learn that on a file called scratch.txt than on your assignment.
Finish by opening your folder in VS Code
You have a course folder now. Point the editor at it, so that your files and your terminal are in the same place for the rest of the semester.
Choose File → Open Folder, type /home/<username>/cs112 (with your own username, the one you noted down earlier), and click OK. VS Code reconnects with the course folder open. If it asks whether you trust the authors, say yes.
Open a terminal again with Terminal → New Terminal, and run:
pwdIt should print /home/<username>/cs112. When it does, your editor and your terminal are both pointed at the same folder, your environment is finished, and everything from here on happens inside it.
Commands act on the folder you are standing in.
make, which you will use to compile, looks for a file called makefile in the current folder and nowhere else. Run it one level too high and you get:
make: *** No targets specified and no makefile found. Stop.That message means “you are in the wrong folder”, not “your code is broken”, but it does not say so, and it looks alarming the first time. Later in the semester, when you have several assignments side by side, the wrong folder is worse than an error. make finds a perfectly good makefile and cheerfully builds the other assignment, and you spend ten minutes wondering why your changes have no effect.
When anything surprises you, type pwd before you type anything else.
7. Set Up VS Code for C++
A few one-time settings will make your life much easier all semester.
Install the C++ extension:
This is what gives you C++ syntax coloring, code formatting, and the squiggly underlines that flag mistakes as you type. Open the Extensions panel (left sidebar), search for C/C++ Extension Pack, and click Install.
You have no C++ files yet, so install it directly. VS Code will not offer it until you open one.
Configure Auto Save:
Open the Settings editor with Ctrl+, (Cmd+, on a Mac). In the search bar at the top, type files.autoSave, and set it to onFocusChange.
This saves the file whenever the focus leaves the editor, so you will not lose work by forgetting to save. Leave the Settings tab open, because the next two settings are in it too.
Set Tab Size:
In the same Settings tab, search for editor.tabSize and set it to 4.
Set C++ Formatting Style:
A formatter tidies your code for you, giving it consistent indentation, consistent spacing, and line breaks in sensible places. You write it however it comes out, then press a key and it straightens up. Setting the same style now means your code and mine and your classmates’ all look alike, which makes code far easier to read together, and it means you never argue with yourself about indentation again.
Under Extensions → C/C++ → Formatting, find C_Cpp: Clang_format_style. Use the copy button in the corner of the box below, then paste it into the setting. It has to go in as one line, so paste it whole:
{ BasedOnStyle: Google, IndentWidth: 4, AccessModifierOffset: -4, AllowShortFunctionsOnASingleLine: InlineOnly }It is long, and the settings box will only show you the start of it. That is normal, and you never have to read it there. Here is what each piece of it does:
| Piece | What it does |
|---|---|
BasedOnStyle: Google |
start from Google’s published C++ style |
IndentWidth: 4 |
indent by four spaces |
AccessModifierOffset: -4 |
pull labels like public: back toward the left margin |
AllowShortFunctionsOnASingleLine: InlineOnly |
only keep a function on one line if it is very short |
Nothing will look different yet, because you have no C++ code. Once you do, the Format Document command reformats the file you are looking at, and that is how you will know this setting took. The shortcut depends on your laptop:
| Your laptop | Format Document |
|---|---|
| Windows | Shift+Alt+F |
| macOS | Shift+Option+F |
| Linux | Ctrl+Shift+I |
If you would rather not remember it, right-click in the file and choose Format Document.
8. No AI Assistants in CS112
This is a course rule, not a suggestion. No AI coding assistant may write, complete, or explain code for you in CS112. If you are found using one during lab, you do not receive the completion check for that assignment.
Why this rule exists. Three times this semester you will sit in my office for twenty-five minutes, and I will hand you a question drawn from each cluster of skills that window covers. Sometimes a prompt to talk through, sometimes a short piece of code to write there and then. No assistant, no browser tab, no notes. Just you and the question.
Those three sessions are the backbone of your grade. Nothing you submitted gets you through them; the only thing that helps is being able to do the work. The assignments are the practice that builds that ability, and an assistant that does your assignments for you does not make the check-in easier. It makes the check-in the first time you have ever tried.
The other reason is simpler. You are here to learn to build these structures yourself, from memory up, and that skill is built by struggling with a compiler error for twenty minutes and then understanding it. An assistant hands you the answer and takes the twenty minutes away, along with everything you would have learned in them.
This applies to every assistant, not only Copilot. Copilot and Copilot Chat, Cursor, Windsurf, ChatGPT, Claude, Gemini, and anything else that writes or finishes code for you. Closing one extension while another sits in a browser tab is not following the rule. See the academic honesty policy for how this fits with the rest of the course.
To turn every AI feature off in VS Code:
VS Code has one setting that does the whole job. It hides chat, turns off inline suggestions, and disables the Copilot extensions outright.
- Open the Settings editor: Ctrl+, (Cmd+, on a Mac).
- In the search box at the top, type
chat.disableAIFeatures. - Above the results are tabs reading User, Remote [Coder: …], and Workspace. Click Remote.
- Tick the checkbox.
Choosing Remote applies the setting to the Calvin server, which is where all your CS112 work happens. Anything you write on your own laptop, for your own projects, is untouched.
After that, the Copilot icon disappears from the status bar and the chat panel goes away. That is what you want to see.
If you would rather only silence the autocomplete
Some of you use Copilot in other courses and would rather not disable it wholesale on the server. There is a lighter switch that stops the suggestions without turning the extension off. It is not enough on its own for CS112, because it leaves the chat panel working, but it is the fastest way to stop code appearing under your cursor while you think.
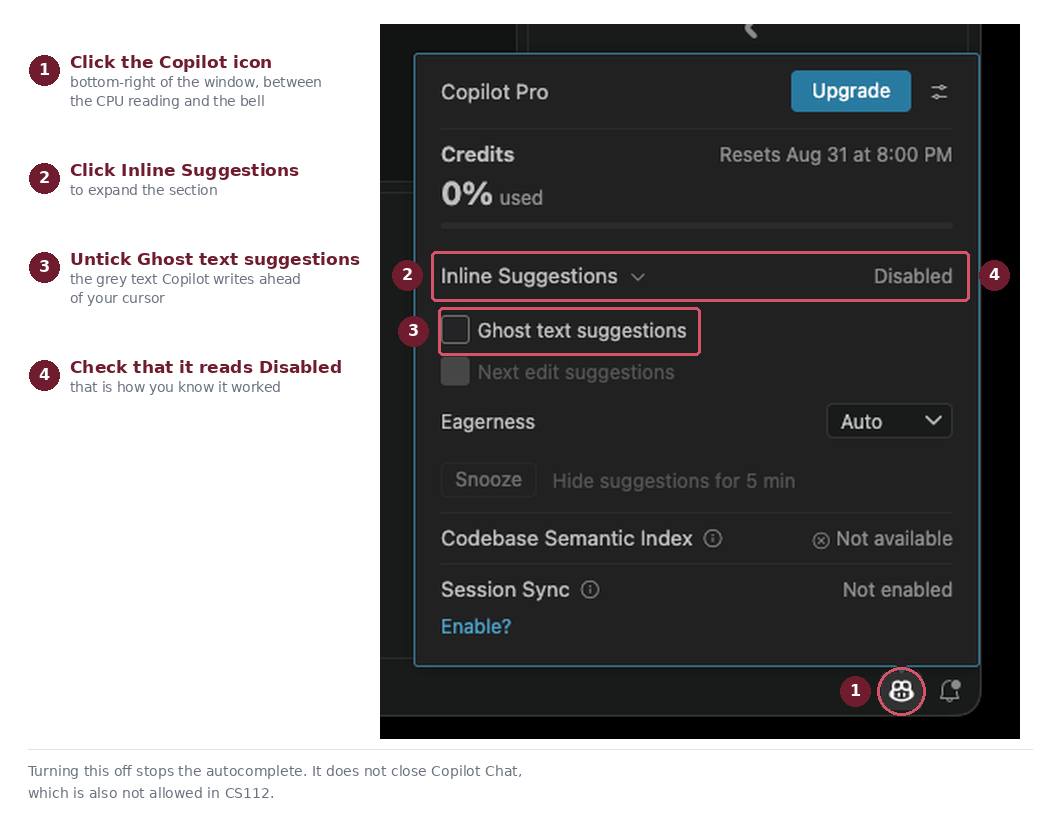
If you take this route, you are on your honour about the chat panel. The rule is the same either way.
This covers every assistant that plugs into VS Code, not only Copilot. If you also use ChatGPT, Claude, Gemini or anything similar in a browser while you work, the rule still applies. Closing one panel and opening another tab is not following it.
9. Get Your Repository
You do not accept anything, and there is no link to click. Once your GitHub username is on the class roster, a private repository is created for you with the starter code already in it. Only you and the instructor can see it. Every assignment this semester arrives the same way.
First, make sure both parts of Step 2 are done: you have sent me your GitHub username, and you have accepted the emailed invitation to the 26fa-cs112 organization.
Until you accept that invitation, your repository exists but is invisible to you, github.com/26fa-cs112 will show you a “page not found”. That is the single most common thing that goes wrong here.
If you have been waiting more than a day, email me.
Your repository is named cs112-a00-YOURUSERNAME, all in lowercase, and it lives at:
https://github.com/26fa-cs112/cs112-a00-YOURUSERNAMEPut your own username in place of YOURUSERNAME and that address opens in a browser. Keep it to hand. It is how you check that what you pushed actually arrived.
Every assignment follows the same pattern: cs112-<assignment>-<your username>.
Sign in to GitHub from the terminal, once
Coder needs to prove to GitHub that you are you. You do this once, and never think about it again for the rest of the semester.
In your VS Code terminal (the one connected to Coder):
gh auth loginAnswer the three questions like this:
| Question | Answer |
|---|---|
| Where do you use GitHub? | GitHub.com |
| What is your preferred protocol for Git operations on this host? | HTTPS |
| How would you like to authenticate GitHub CLI? | Login with a web browser |
It then shows you a one-time code like 4BD1-FB85. Copy it and press Enter. A browser tab should open on your own computer, Coder itself has no browser, so this is handed back to your laptop. If no tab opens, copy the https://github.com/login/device link it printed and open that yourself.
Paste the code into that page and sign in as the GitHub account whose username you sent me.
When it finishes you will see:
✓ Authentication complete.
- gh config set -h github.com git_protocol https
✓ Configured git protocol
! Authentication credentials saved in plain text
✓ Logged in as YOURUSERNAMEYou will also see a line saying “Authentication credentials saved in plain text.” That is expected on a server like Coder, which has no keychain to store them in. Your home directory on Coder is yours alone.
The ✓ Configured git protocol line says that signing in also taught Git itself to use this login. So pushing your code later just works, and you will never need an SSH key in this course.
Tell Git how to combine my work with yours, once
One more one-time setting, in the same terminal:
git config --global pull.rebase falseLater in the semester I will occasionally push a correction into your repository, to a file you do not own. When that happens your copy and GitHub’s copy have both moved on from the same point, and Git has to join the two lines back together. This setting tells it to join them by merging, which is what every assignment in this course assumes.
Why set it now rather than when it first matters? Without it, Git will not choose for you. It stops with
fatal: Need to specify how to reconcile divergent branches.and pulls nothing, which is a confusing thing to meet for the first time on an evening when you are trying to get work done. One line now, and you never see it.
Clone your repository
Make sure you are in your cs112 folder:
cd ~/cs112
pwd
That should print /home/ followed by your Calvin username and /cs112, for example /home/ea47/cs112. Coder logs you in with your Calvin account, so the folder is named after that, not after your GitHub username. The two are different, and both appear in the next command.
Now clone, replacing YOURUSERNAME with your GitHub username:
gh repo clone 26fa-cs112/cs112-a00-YOURUSERNAMEThis is one of the exceptions to typing everything. The repository address is long, you will type it once in your life, and a single wrong letter gets you Could not resolve to a Repository. Copy the line, then replace YOURUSERNAME with your own before pressing Enter.
The cd below is not an exception, but do not type all of it either: type cd cs112-a00 and press Tab, and the shell will finish the name for you, correctly, every time.
Then look at what you got:
cd cs112-a00-YOURUSERNAME
ls
You should see six files: main.cpp, fortune.h, fortune.cpp, makefile, test.py, and README.md.
If you get Could not resolve to a Repository, the usual cause is that you have not accepted the organization invitation yet, go back to Step 2. The second most likely cause is a typo in your username, or capital letters: the repository name is entirely lowercase, even if your GitHub username is not.
Now open the folder in VS Code. From that same terminal:
code .Or use File → Open Folder and navigate to the folder you just cloned, inside cs112 in your home directory.
One last setting, now that you have C++ code
There is one VS Code setting that could not be done in Step 7, because the command does not show up until the C/C++ extension has something to work on. You have a C++ file now.
- In the VS Code file list, click
main.cppto open it. This wakes up the C/C++ extension. - Press Ctrl+Shift+P (Cmd+Shift+P on a Mac).
- Search for
C/C++: Select IntelliSense Configuration. - A list of the compilers found on the machine appears. Choose the g++ entry. On this server the compiler lives at
/usr/bin/g++, so that is the path you should see next to it.
This tells the editor which compiler you are actually building with, so the underlines it draws match the errors make will report. Without it, VS Code guesses, and it can flag things that compile perfectly well or stay silent about things that do not.
While main.cpp is open, try Shift+Alt+F (Shift+Option+F on a Mac). The file reformats itself using the style you set in Step 7. Nothing about the code changes, only its shape.
10. Understanding the Makefile
Before you compile anything, let us understand how compilation works. This is the step that has no equivalent in an interpreted language, and it is worth ten minutes of your attention now.
How C++ compilation works
Your source code goes through two stages before it can run:
Stage 1: Compile. Each .cpp source file is individually translated into an object file (.o). Object files contain machine code, but they are not yet runnable, because they might refer to functions defined in other files.
Stage 2: Link. The linker combines all the .o files into a single executable (in our case, a file called a00). This is the program you actually run.
The third kind of file: headers
Look at your folder again and you will see a file this course has not explained yet: fortune.h. Files ending in .h are headers, and they exist because of how Stage 1 works.
When the compiler translates main.cpp, it looks at that file and nothing else. So when it reaches your call to getFortune(...), it has a problem. The function is written in fortune.cpp, which it is not reading. It has no idea whether getFortune exists, what arguments it takes, or what it gives back.
A header is how you tell it. fortune.h contains the promise, one line saying “there is a function called getFortune, it takes two ints, and it returns a string”, with no code behind it. So main.cpp starts with:
#include "fortune.h"#include means paste that file in here before compiling. The compiler now knows enough to translate the call, and the linker in Stage 2 is what finally connects it to the real function in fortune.o.
The rule of thumb for the whole semester: .h says what exists, .cpp says what it does.
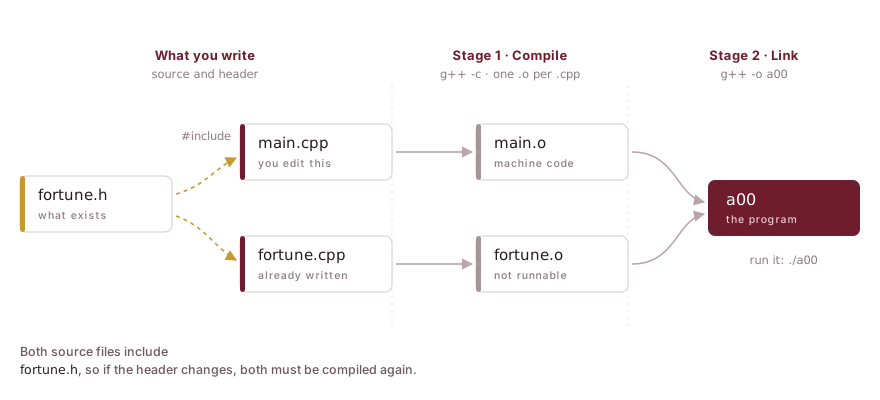
fortune.h, which is why a change to the header means both have to be compiled again.
Doing this manually every time would look like:
g++ -Wall -std=c++17 -c main.cpp        # produces main.o
g++ -Wall -std=c++17 -c fortune.cpp     # produces fortune.o
g++ -Wall -std=c++17 -o a00 main.o fortune.o  # produces a00
That is three commands, and if you only changed fortune.cpp, you would still have to remember which commands to re-run. A makefile automates this.
Reading the makefile
Open makefile in VS Code. Here is what each part does:
CXX      = g++
CXXFLAGS = -Wall -std=c++17
These are variables. CXX is the compiler name. CXXFLAGS are the options we always pass to it. -Wall turns on all warnings (helpful!), and -std=c++17 selects the C++17 standard.
a00: main.o fortune.o
    $(CXX) $(CXXFLAGS) -o a00 main.o fortune.o
This is a rule. The format is:
target: dependencies
    command
a00 is what we want to build. It depends on main.o and fortune.o. If either of those is out of date, make runs the command to rebuild a00. Notice the command line starts with a tab character. Makefiles require this, not spaces.
main.o: main.cpp fortune.h
    $(CXX) $(CXXFLAGS) -c main.cpp
This rule says: to build main.o, compile main.cpp (the -c flag means “compile only, don’t link yet”). It depends on fortune.h too. If the header changes, main.o needs to be rebuilt.
fortune.o: fortune.cpp fortune.h
    $(CXX) $(CXXFLAGS) -c fortune.cpp
Same idea for fortune.cpp.
clean:
    rm -f *.o a00
make clean deletes all object files and the executable. Use this when you want a completely fresh build.
make is smart about what to rebuild
make only recompiles files that have changed since the last build. If you only edit fortune.cpp, make will recompile fortune.o and re-link a00, but it will not recompile main.cpp, because main.cpp has not changed. This saves time on larger projects.
11. Compile and Run the Starter Code
In your VS Code terminal, make sure you are inside your cs112-a00-YOURUSERNAME directory, pwd will tell you, and this is the moment it matters. Then type:
makeIf you see No targets specified and no makefile found, you are in the wrong folder, not looking at broken code. cd into the repository and try again.
You should see output like:
g++ -Wall -std=c++17 -c main.cpp
g++ -Wall -std=c++17 -c fortune.cpp
g++ -Wall -std=c++17 -o a00 main.o fortune.o
Type ls. You should now see a00 in the directory. Run it:
./a00The ./ means “run this file in the current directory.”
You will see the Oracle’s banner and the line about consulting the ancient data structures, and then the program ends without ever asking you anything. That is expected. main.cpp still has empty placeholders where the questions and the fortune belong. Filling them in is your task in the next section.
12. Your Coding Task: Complete main.cpp
Open main.cpp in VS Code. This is the only file you will edit. fortune.cpp and fortune.h are already complete. Read through them to get a sense of how a C++ function is written, but do not change them.
main.cpp has four TODO comments. Work through them in order.
The same rule applies to the C++ below. The examples on this page are there to be read and then typed into your own file, not copied into it. Typing a line like cout << "Your name: "; is how you learn where the quotes go, which way the << arrows point, and that the semicolon is not optional. Copy it and you will find all three out later, in an error message, at a worse moment.
TODO 1: Declare your variables
Every variable in C++ is declared with a type, before you use it. The type tells the compiler how much memory the variable needs and what may be stored in it:
string name;
int stressLevel;
int birthMonth;
string holds text. int holds a whole number. Notice the semicolon at the end of each line. Every statement in C++ ends with one.
Add these three declarations where TODO 1 is.
Now run make, before you write anything else. It takes two seconds.
You will see this:
main.cpp: In function 'int main()':
main.cpp:26:9: warning: unused variable 'stressLevel' [-Wunused-variable]
   26 |     int stressLevel;
      |         ^~~~~~~~~~~
main.cpp:27:9: warning: unused variable 'birthMonth' [-Wunused-variable]Warnings are not errors.
An error means the compiler gave up. There is no program at the end. A warning means it built your program but noticed something suspicious.
These two are correct and expected. You have declared stressLevel and birthMonth but not used them yet, and -Wall, the flag in your makefile that turns on all warnings, is telling you so. They will disappear on their own when TODO 2 starts using the variables.
Read your warnings. Over the semester, -Wall will catch real mistakes for you long before they become a debugging session.
Why compile after every small change? Because compiler errors are far easier to read one at a time. If you write all four TODOs and then compile for the first time, a single missing semicolon near the top can produce twenty errors further down, most of them nonsense caused by the first one. Compile after each TODO and every error you see belongs to the handful of lines you just wrote.
Press the Up arrow and Enter to re-run make, you will do this hundreds of times this semester.
TODO 2: Print prompts and read input
Use cout to print a line to the screen and cin to read input from the keyboard.
Printing with cout:
cout << "What is your first name? ";The << operator sends text to the output stream.
A word about endl, because you have already seen it without being told what it is. The banner at the top of main.cpp is full of lines like:
cout << " Welcome to the CS112 Oracle!" << endl;endl ends the line. Everything printed after it starts on a fresh line. It is the equivalent of pressing Enter. You can chain as many things onto one cout as you like, and endl is simply the last of them.
Now look again at the prompt above. There is no endl on it, and that is deliberate. Without one, the cursor stays put at the end of the text, so the user types their answer right after the question instead of on the line below:
What is your first name? JordanLeave the endl off your three prompts for the same reason. You will want it in TODO 4, where each line of the Oracle’s response should stand on its own.
Reading with cin:
cin >> name;The >> operator reads one word (or number) from the keyboard and stores it in the variable.
Notice that printing the prompt and reading the answer are two separate statements in C++. Write one cout and one cin for each of the three pieces of information.
Use these exact prompt strings (the autograder will check them):
"What is your first name? "
"On a scale of 1-5, how nervous are you about CS112? "
"What month were you born in (1-12)? "Why “first name” and not “name”?
cin >> stops reading at the first space. If the prompt said “What is your name?” and someone typed Eric Araujo, cin would put Eric in name and leave Araujo sitting in the input, and the very next cin >> stressLevel would try to read Araujo as a number, fail, and leave both numbers as garbage. The program would still run, print a wrong fortune, and never tell you anything was wrong.
Many languages hand you the whole line when you ask for input. cin >> hands you one word at a time. Asking for a first name sidesteps the problem for now, and you will learn how to read a whole line later in the semester.
Compile again before you move on, make, and fix anything it complains about. Two TODOs done is a good place to stop and check.
Now save your work to GitHub
Everything you have written so far exists in exactly one place: a folder on the Coder server. Push it and there are two copies, one of them somewhere you cannot break.
In VS Code, click the Source Control icon in the left sidebar, it looks like a branch, and it will have a small badge showing how many files you have changed.
- Your changed files are listed under Changes. Hover over
main.cppand click the + to stage it. - Type a short message in the box at the top, such as
Prompts and input working. - Click ✓ Commit.
- Click Sync Changes to send it to GitHub.
The same thing in the terminal. Every button above is a command underneath. You will meet these commands in every programming job you ever have, and on machines with no editor at all:
git add main.cpp     # the + button: stage this file
git commit -m "Prompts and input working"    # the ✓ button
git push             # Sync Changes
Use whichever you prefer. The buttons and the commands do exactly the same thing, and Step 13 explains what each one means.
Expect a red X on GitHub, and do not let it worry you.
Pushing starts the automatic check, and your program is not finished, TODO 3 and TODO 4 are still empty, so the check fails. That is the correct result. A red X on unfinished work means the machinery is paying attention. It turns green when all four TODOs are done and make test passes.
You do not have to wait until an assignment is finished to push, and you should not. Commit and push whenever something works. It costs ten seconds, it means a broken laptop or a lost workspace costs you nothing, and later in the semester it gives you a working version to go back to when an experiment goes wrong.
TODO 3: Call getFortune()
getFortune() is a function declared in fortune.h. It takes two int parameters and returns a string. Call it like this:
string fortune = getFortune(stressLevel, birthMonth);This creates a new string variable named fortune and stores the result of the function call in it. Add this line where TODO 3 is.
TODO 4: Print the Oracle’s response
Use cout to print two lines inside the banner, with a blank line between them, so the screen ends up looking like this:
  The Oracle speaks, NAME!

FORTUNE
Where NAME and FORTUNE are your variables. The gap in the middle is a real blank line and the tests look for it, a bare cout << endl; on its own is how you print one. Note the two spaces before The, as well. In C++, you can chain multiple things on one cout line:
cout << " The Oracle speaks, " << name << "!" << endl;Compile and test
After filling in all four TODOs, compile:
makeIf you see errors, read them carefully. The compiler tells you the file name and line number of the problem. Fix the error and make again.
Run the program:
./a00Enter your name, a stress level between 1 and 5, and your birth month. You should see the full Oracle experience, including a fortune at the end.
Once it looks right, run the autograder:
make testYou will see a PASS or FAIL for each test case, with hints if something is wrong. Fix any failures and run make test again until all tests pass.
There are 14 checks, one per requirement, so a failure points at exactly one thing. An untouched starter scores 0 / 14. When all four TODOs are done you should see:
Results: 14/14 passed
All tests passed. Push your code to GitHub.There are no hidden tests. What you run with make test is exactly what the grader runs: all 14 checks. If it passes here, it passes there.
Grading always runs the official test suite, not the copy in your repository. Editing test.py will not change your score.
What about make clean?
If edits do not seem to take effect, try:
make clean
make
This forces a completely fresh build.
13. Push Your Code to GitHub
When all tests pass, submit your work to GitHub.
Add your name to the README.md file before pushing. Open it in VS Code, add a line with your name, and save.
Click the Source Control icon in the left sidebar, the one that looks like a branch, with a badge counting your changed files.
- Stage what you want to send. Under Changes, hover over each file and click +. You should be staging
main.cppandREADME.md. - Write a message in the box at the top.
Complete main.cppis fine. A message describes what changed and why, “stuff” and “asdf” will make sense to nobody, including you, in November. - Commit, click ✓ Commit. Your snapshot now exists, on the server.
- Sync Changes, this is the step that sends it to GitHub. A commit without it is a diary entry nobody else can read.
The same thing in the terminal. Underneath, VS Code is running these:
git add main.cpp README.md    # stage: choose what goes in
git commit -m "Complete main.cpp"    # commit: take the snapshot
git push                             # sync: send it to GitHub
Learn both. The buttons are faster day to day; the commands are what you will find in every tutorial, every Stack Overflow answer, and every machine that has no editor installed, which, in this field, is most of them.
To verify the push worked, open your repository on github.com and confirm your updated main.cpp is there. Nothing has been submitted until you can see it in the browser.
Within a minute or two, the Actions tab of your repository shows a run named Autograde. Open it. Under the job you will find a summary saying how many checks passed, and, if any failed, which ones, with the same hints make test gives you. A green tick means every check passed; a red X means at least one did not.
The tick is not your grade. It runs the same make test you run on Coder, as a convenience so you can see the result without opening a terminal. Your mark comes from the official test suite, run separately. If the tick is ever missing or the run fails for reasons that have nothing to do with your code, make test locally is the answer that counts.
Getting Started does not count toward your course grade. It is here so that this machinery is already familiar when it does.
You are ready!
Congratulations! Your development environment is set up and you have written your first C++ code for CS112. See you in class!
Working from home? As long as you have VS Code and can connect to Coder, you can do all your CS112 work from your laptop anywhere with internet. The setup you did today is all you need.