Assignment 02: Functions and Parameter Passing
Your own private GitHub repository is waiting for you, but get the order right: start your Coder workspace first, connect VS Code to it, and only then clone the repository onto the Calvin machine (see Getting the code below). Cloning onto your own laptop instead gives you code you cannot compile.
Plan to set aside about 3 to 3.5 hours. Writing the header and finding the first fault are the slow parts; once the machine runs at all, the rest moves quickly. The three new instructions are the take-home half.
Objectives
By the end of this assignment, you will be able to:
- Write a header file from scratch, with an include guard and a set of prototypes
- Explain why a function that must change its caller’s variable takes a reference
- Find a fault in working code by comparing what it does against what it should do
- Use
switchwithbreakto dispatch on a value, and say what happens without thebreak - Write a loop whose counter moves backwards through an array
- Recognize unsigned underflow when it is the cause of a fault
- Pass an array to a function, and explain why its length has to travel separately
- Describe how a stored program, a stack and a program counter make a computer
The skills this trains
These objectives map to course skills A2, A3, and A4, all in cluster A, C++ Foundations, which you demonstrate at check-in window W1. This is the assignment where A4 is tested.
| Skill | Where it shows up here | |
|---|---|---|
| A2 | basic data types, variables, const, operators |
unsigned for the stack depth, const on the parameters that only read, and the underflow that happens when an unsigned goes below zero |
| A3 | pointers | not new and delete, which arrive in week 4, but the reason run has to be told how long the program is: an array becomes a pointer the moment it is passed to a function |
| A4 | control structures and functions with correct parameter passing | the whole assignment. The switch that dispatches on an instruction, the loop that fetches them, and six functions whose parameter modes decide whether the machine works |
A4 is the one to watch. It is marked persistent in the course plan, which means it keeps being assessed after this week. Everything from a03 onward assumes you can decide, without being told, whether a parameter should be passed by value, by reference, or by const reference. Fault 4 in this assignment is what that decision looks like when it goes wrong.
1. The CS112 Model 112
Before phones, before laptops, engineers carried a calculator that could be programmed. You entered a sequence of keystrokes once, the calculator remembered them, and from then on you could replay the whole calculation with a single button. The HP-12C, launched in 1981, is still sold today.
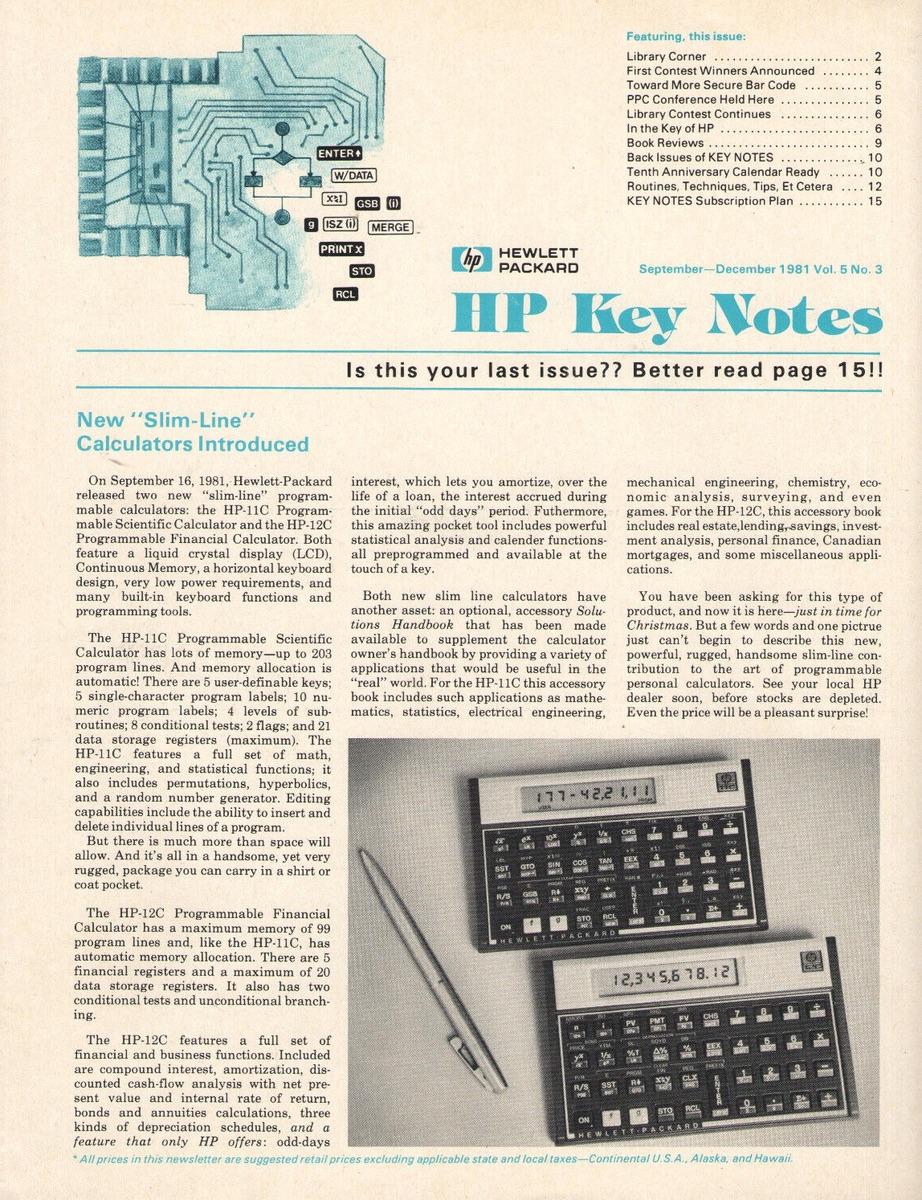
The calculator does not store a formula. It stores the keystrokes themselves, as a list of numbers, and then presses them for you.
You are repairing the firmware of one of these: the CS112 Model 112. The hardware is already manufactured, so the only thing anybody can change now is the code, and the only place to test a change is the bench simulator, which is what make test is.
How it thinks
The Model 112 has no variables. It has one pile of numbers, called the stack. Every instruction either puts a number on top of the pile, or takes one or two off the top and puts a result back.
Here is a program that computes (7 + 5) * 3:
PUSH 7
PUSH 5
ADD
PUSH 3
MUL
PRINT
HALT
And here is the pile after each line:
| Instruction | The stack afterwards | What happened |
|---|---|---|
PUSH 7 |
7 |
put 7 on top |
PUSH 5 |
7 5 |
put 5 on top |
ADD |
12 |
took 5 and 7 off, put 12 back |
PUSH 3 |
12 3 |
|
MUL |
36 |
took 3 and 12 off, put 36 back |
PRINT |
(empty) | took 36 off and printed it |
HALT |
stop |
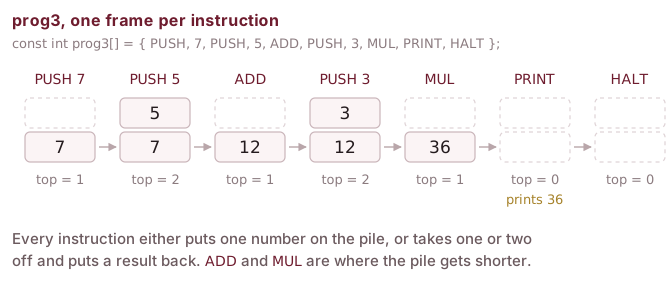
ADD and MUL are where the pile gets shorter. Each takes two numbers off and puts one back.
That is how a calculator works. Every row of this table is a real key:
| On the keypad | In the machine |
|---|---|
press 7, then ENTER |
PUSH 7 |
press + |
ADD |
| the display | what PRINT writes |
| a saved keystroke sequence | a program, stored as an array of int |
the x≠0? conditional skip |
JNZ |
The last row is doing more work than the others. Every key above it does one fixed job and moves on to the next keystroke. x≠0? instead looks at a number and decides what to run next, which is how a saved sequence can go back and repeat a step. In the Model 112 that key is the instruction called JNZ. You will write it yourself in Task 3.
This is called reverse Polish notation, or RPN. You write 7 5 + instead of 7 + 5, and in exchange you never need a bracket. Whole languages are built this way: Forth, PostScript, and the bytecode inside the Java and Python you have already run.
2. Getting the Code
Your private GitHub repository for this assignment is created for you inside the course organization, with the starter code already in it. There is nothing to accept and nothing to set up, if you are on the roster, it is there.
Clone it, replacing YOURUSERNAME with your GitHub username:
gh repo clone 26fa-cs112/cs112-a02-YOURUSERNAME
cd cs112-a02-YOURUSERNAMECannot find your repository?
If gh repo clone answers Could not resolve to a Repository, list the repositories you can see:
gh repo list 26fa-cs112If yours is in the list, you mistyped the name. Copy it from the output and try again. Usernames that already contain a hyphen or a number are the easy ones to get wrong, because the pattern is cs112-<assignment>-<your username>.
If the list is empty, or the command errors, email me. The usual causes are an organization invitation you have not accepted yet (check your email, including spam and the Promotions tab), or a username I mistyped when I built the roster. Write to eric.araujo@calvin.edu and I will sort it out the same day.
While you wait, do not create a repository yourself and do not start the work somewhere else. Only the repository I create for you is connected to grading, and work done anywhere else has to be moved over by hand.
What is in it
| File | |
|---|---|
machine.cpp |
the firmware. This is what you repair. |
machine.h |
it is not there. You write it. |
calc.h |
the instruction set and the status codes. Do not edit. |
main.cpp |
the bench rig and the ten stored programs. Do not edit. |
makefile, test.py |
build and checks. Do not edit. |
The starter does not compile, and that is not a mistake.
Run make right now and you will get:
make: *** No rule to make target 'machine.h', needed by 'main.o'. Stop.There is no machine.h in your repository because writing it is the first task. Nothing else in this assignment can be done until it exists, so start there.
3. Reading a stored program
Open main.cpp and look at prog1:
const int prog1[] = {
    PUSH, 7,      // 0
    PUSH, 5,      // 2
    ADD,          // 4
    PRINT,        // 5
    HALT          // 6
};
That is one array of int. PUSH, ADD and the rest are just names for numbers, given in calc.h, so that a program can be written as words instead of as {1, 7, 1, 5, 3, 6, 7}.
They really are just numbers. calc.h writes each one down as a plain int:
const int PUSH  = 1;
const int ADD   = 3;
const int PRINT = 6;
const int HALT  = 7;
The compiler swaps the names for the numbers before anything runs, so prog1 and {1, 7, 1, 5, 3, 6, 7} are the same seven ints. run only ever sees numbers, which is why its switch dispatches on an int, and why one it does not recognize can only be reported as ERR_OPCODE.
Two things about it come back later.
The comment on each line is a step number, and they are not consecutive. PUSH occupies two steps: the instruction, and then the value to push. Every other instruction occupies one. So after running the PUSH at step 0, the machine has to move on by two, not one, or it will try to execute the 7.
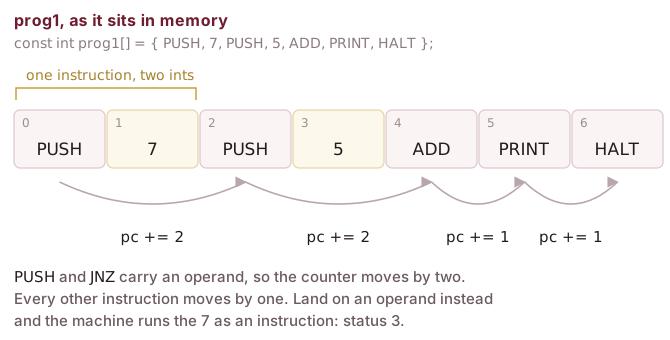
PUSH and the number after it are one instruction spread over two slots, which is why the program counter does not always move by the same amount.
The stack grows and shrinks as the program runs. Nothing in the program says how deep it is. That is tracked separately, by a variable the machine keeps as it goes.
How the machine is built in C++
int stack[STACK_MAX];   // the pile of numbers
unsigned top = 0;       // how many of them there are
top is not the index of the top value. If top is 3, the values are at stack[0], stack[1] and stack[2], and the top one is stack[2]. So top is one past the last value in use, and it is also the index of the next free slot.
Read that twice. It is the sort of thing an off-by-one hides in. Here is the same sentence as a picture:
![A column of five stack slots labeled stack[0] at the bottom through stack[4] at the top. The bottom three hold 7, 5 and 3; the top two are empty and drawn dashed. A maroon tag reading top = 3 points at the first empty slot, stack[3], captioned the next free slot, while stack[2] is labeled stack[top minus 1], the top value. Cards to the right state that the top value is stack[top - 1] and stack[top] is where the next push goes; that push writes at stack[top] then increments top, while pop decrements top then reads stack[top]; and that because top is unsigned, popping an empty stack makes top - 1 wrap to 4294967295 rather than becoming -1.](../../figures/stack-top.svg)
top counts the values; it does not point at the last one.
4. Task 1: write machine.h
Create a new file called machine.h in the same folder, and declare the six functions that machine.cpp defines.
You have seen a header before, in a01, and there is a complete one sitting in your repository right now. Open calc.h and copy its shape. It has an include guard, it has a comment saying what it is for, and it ends with #endif.
What goes in a header, and why.
machine.cpp defines the functions. main.cpp calls them. But main.cpp is compiled on its own, before the linker ever sees machine.cpp, so at that moment the compiler has no idea whether pop exists or what it takes.
A header is how you tell it. #include "machine.h" pastes the declarations into main.cpp, and the compiler can then check every call. The linker matches them up with the real definitions afterwards.
Get a declaration wrong and you do not get a wrong answer. You get an error at link time, saying a function was called that nobody defined, because a declaration that does not match a definition describes a different function.
These are the six, exactly:
void push(int stack[], unsigned& top, int value);
int  pop(int stack[], unsigned& top);
bool isEmpty(unsigned top);
void dump(const int stack[], unsigned top);
int  run(const int program[], unsigned length, int stack[], unsigned& top);
unsigned mine(int program[]);
Do not copy them without reading them. Three ways of passing a parameter appear in those six lines, and what separates them is what the function is allowed to do to the caller’s variable. Each row below is a single parameter, written exactly as it appears inside the brackets above.
| Parameter, as you write it | What the function gets | Use it when |
|---|---|---|
unsigned top |
a copy | it only needs to read the value (isEmpty) |
unsigned& top |
the caller’s variable itself | it must change it (push, pop) |
const int stack[] |
the caller’s array, read-only | it reads an array (dump, run) |
int stack[] |
the caller’s array, writable | it writes into an array (push, mine) |
Arrays are the odd ones out. They are never copied, so a function always has the caller’s real array and const is the only way to promise you will not write to it. An array also arrives as a bare address that does not know its own size, which is why run takes unsigned length beside program.
Once machine.h exists, make should succeed and ./a02 prog1 should run. It will print the wrong answer. That is the next task.
Commit machine.h as soon as it works. You created it yourself, so git is not tracking it until you add it. In VS Code’s Source Control panel it appears under Changes with a U beside it, for untracked. Stage it with the +, commit, and sync.
In the terminal that is git add machine.h, then commit and push as usual. A header that only exists on your own machine is a repository that does not build, and grading only ever sees what you pushed.
5. Task 2: the five faults
The Model 112 went into testing with exactly five faults in machine.cpp. You know how many there are. You do not know where.
None of the five is a compiler error. The compiler finds those for you and tells you the line number. All five of these compile cleanly and behave wrongly, which is the kind you have to find by reading, thinking, and running the machine to see what it actually did.
The comments in machine.cpp describe what each piece is supposed to do, and they are accurate. The code is what is not. Comparing the two is most of the work.
Run the stored programs and compare what you get against what each one says it expects:
./a02            # lists all ten
./a02 prog1      # 7 + 5
./a02 prog3      # (7 + 5) * 3
./a02 prog10     # pushes three values and prints none
Every run prints the program’s own output, then the stack that was left, then a status number:
12
stack after: (empty)
status: 0
The status is not the answer. It is a report on how the machine stopped, in the same way that the number main returns is a report to the shell. Zero means nothing went wrong. The others are listed at the bottom of calc.h.
Faults can hide each other. One of the five stops the stack from ever shrinking, and while that is true almost nothing behaves normally, including the parts that are correct. Expect the picture to change sharply when you fix it, and do not conclude that a fault you already fixed has come back.
Work one program at a time, smallest first. prog1 is four instructions long and there is nowhere for a fault to hide in it.
There is no debugger in this assignment, and that is deliberate.
You will meet one in a03, and it is a fine tool. But a debugger shows you what the machine did, and what you need first is the habit of working out what the code says it will do. That habit is the thing that makes you fast later, and the only way to build it is to sit with code you did not write until you understand it.
So: read. The whole of machine.cpp is about a hundred and sixty lines, and you should end this assignment able to explain every one of them.
How to find a fault by reading
Trace a program by hand, on paper. Take prog1, four instructions long, and draw the stack after each one, the way the table in §1 does. Then run ./a02 prog1 and compare. The first row where your table and the machine disagree is the instruction that contains the fault.
Read the comment, then read the code under it. The comments in machine.cpp say what each piece is supposed to do, and they are accurate. The code is what is not. Several of the five are visible the moment you hold one against the other and ask “does it, though?”
Start with the smallest program that goes wrong. prog1 has nowhere for a fault to hide. prog7 runs a loop and touches almost everything, so leave it for last.
Fix one thing, rebuild, run again. Changing three things at once and getting a different wrong answer teaches you nothing about which change did what.
Say what you expect out loud before you press Enter. If you cannot predict what the machine is about to print, you are guessing, and guessing on a five-fault program takes a very long time.
Two of the five are about top, the number that says how deep the stack is. When a program prints something bizarre, ask what top was at that moment, and which function last had a chance to change it.
6. Task 3: three more instructions
Three instructions are missing entirely. Their TODOs are inside the switch in run, and each says what the instruction has to do. If you run a program that uses one now, the machine meets a number it does not recognize and stops with status 3.
All three have to check the stack before they touch it. An instruction that pops must make sure there is enough on the stack to pop, and one that pushes must make sure there is room, or it returns ERR_UNDERFLOW or ERR_OVERFLOW and stops. The cases already written above your TODOs do this on their first line. Copy the habit.
TODO 1, DUP
Push a second copy of the top value, so a stack of 6 becomes 6 6.
It is the only one of the three that leaves the stack deeper than it found it, so it is the only one that can overflow.
prog5 uses it to square a number without pushing the number twice.
TODO 2, SWAP
Exchange the top two values, so a stack of 10 3 becomes 3 10.
The neatest way is two pops and two pushes. Work out on paper which order the two pushes go in before you write them. Getting it backwards leaves the stack exactly as it was, and the check will tell you nothing more useful than “wrong answer”.
prog6 swaps and then subtracts, and expects -7.
TODO 3, JNZ
JNZ carries an operand, the same way PUSH does: the number written in the step after it. Call it n. It is the step to jump to, and it is fixed in the program.
What JNZ tests is the value on top of the stack, which it pops. If that value is not zero, jump to step n. If it is zero, carry on with the step after the operand.
In pseudocode:
if the stack is empty:
    report ERR_UNDERFLOW and stop

v = pop the top value

if v is not 0:
    pc = program[pc + 1]     jump there
else:
    pc = pc + 2              step past the operand
Note where the two numbers live. v comes off the stack and decides whether to jump. program[pc + 1] is read from the program and decides where to. Nothing ever compares them.
This is the one that turns a list of keystrokes into a program. Every instruction above moves the program counter forward by a fixed amount. This one can move it backwards, which is how a program repeats itself.
![prog7 drawn as eleven cells numbered 0 to 10, reading PUSH, 3, DUP, PRINT, PUSH, 1, SUB, DUP, JNZ, 2, HALT. An arrow above the row runs forward from the JNZ at step 8 to the HALT at step 10, labeled zero: pc += 2. A longer maroon arrow below the row runs backward from step 8 to the DUP at step 2, labeled not zero: jump back to step 2. A card underneath states that JNZ n pops the top value first, then chooses: not zero means pc becomes the unsigned value of program[pc + 1], and zero means pc += 2, stepping over the operand.](../../figures/jnz-loop.svg)
prog7 counting down from 3. The JNZ at step 8 pops a value and picks one of two arrows: back to step 2 while the count is not zero, forward past its own operand to HALT when it is.
Two things to get right:
- the value is popped whether or not the jump happens
- “carry on” means
pc += 2, notpc += 1, becauseJNZcarries an operand in the step after it, exactly likePUSH. Landing on your own operand and running it as an instruction is how you get a status of 3.
n is program[pc + 1]. That is an int and pc is an unsigned, so you will need a cast: (unsigned)program[pc + 1].
prog7 counts down from 3 and should print three lines. Watch the first pass when you trace it: the counter has just become 2, and n is also 2, so the two numbers look like one. They are not, and the next pass pops a 1 while n is still 2. If it prints an endless stream instead, the value is not being popped, or the jump is happening when it should not.
If a program never stops, press Ctrl+C in the terminal. make test gives every program five seconds and then gives up, so an infinite loop shows as a failed check.
7. Task 4: store a program of your own
At the bottom of machine.cpp there is an array called myKeystrokes holding a single HALT. Replace it with a program that computes (7 + 5) * 3, prints the result, and halts. ./a02 mine must print 36 and nothing else.
Write it the way prog1 to prog10 are written in main.cpp.
Two rules, both checked:
- Use the names, not the numbers.
PUSH, 7and not1, 7. A program written as bare numbers is unreadable. - The machine has to do the arithmetic. Storing
PUSH, 36, PRINT, HALTprints the right answer and proves nothing, so the checks require anADDand aMUL, and refuse anyPUSHof a value larger than 9.
8. Testing Your Work
make testTwenty checks, in three groups: the faults, the instructions you added, and your own program. Each failure names a stored program and tells you which of the machine’s jobs is not being done. It does not tell you which line is wrong, because finding that is the assignment.
There are no hidden tests. What you run with make test is exactly what the grader runs, all 20 checks. If it passes here, it passes there.
Grading always runs the official copies of test.py, makefile, main.cpp and calc.h, not the copies in your repository, so editing any of those cannot change your score.
If it does not build, you score zero. There is no partial credit for a repository that will not compile, because there is nothing to run. Almost always the cause is machine.h: a missing &, a const in the wrong place, or a name spelled differently from the definition in machine.cpp.
make test builds exactly the way grading builds, so if it compiles for you it compiles for the grader. Run it before every push.
9. Submit
Before pushing, open README.md and add your name.
In VS Code, click the Source Control icon in the left sidebar. You will see your changed files, including machine.h if you have not committed it yet. Type a commit message such as Model 112 repaired, click the checkmark to commit, then Sync Changes to push. From the terminal, that is:
git add .
git commit -m "Model 112 repaired"
git push
Every push is checked automatically. Within a minute or two the Actions tab of your repository shows a run named Autograde. Open it: the job summary says how many checks passed, and names any that failed.
Do not wait until everything works to push. Push when the header compiles, push again when the first fault is fixed. It costs ten seconds and it means a lost workspace costs you nothing.
10. When I Push a Fix Into Your Repository
Assignments occasionally need correcting after they have gone out. A check turns out to be testing the wrong thing, or a comment in main.cpp says something misleading. When that happens I do not ask twenty-five people to re-clone. I push the corrected file straight into each of your repositories, and I tell the class that I have done it.
Only files you do not own move that way, and each says so at the top:
NOTE TO STUDENTS: You do NOT need to edit this file.
For this assignment that is main.cpp, calc.h, makefile and test.py. machine.cpp and machine.h are yours, and nothing I run will touch them.
What that means for you
Your repository now has a commit on GitHub that your Coder copy does not, so pull before you start working, every session.
In VS Code, the Sync Changes button in the Source Control panel carries a small ↓ count when GitHub has commits you do not. Clicking it brings them down and sends yours up in one go.
The same thing in the terminal.
git pullCommit your own work before you pull. Git will refuse to pull on top of uncommitted edits to a file it needs to replace. Commit first and your work is recorded and impossible to lose in the process.
Then pull, and let it merge. Once I have pushed, there is no way to send your work up until you have brought mine down. git push on its own will be rejected with “the remote contains work that you do not have locally”, and that is Git telling you to pull first. Pull, which merges the two lines of history, and then push.
If git pull answers this:
fatal: Need to specify how to reconcile divergent branches.it is asking how you want the two lines joined, and refusing to guess. This course always merges. Set that once and the message never comes back:
git config --global pull.rebase falseThen git pull as usual. You did this in Getting Started; this is the same setting, for a new machine or a session where you skipped it.
a01 explains what a merge is and what to do if one reports a conflict. The short version: your main and GitHub’s origin/main both grew from the same point, git pull joins them with a single new commit that has two parents, and that is normal. If it does report a conflict, the file will be one you were told not to edit, and my version is the one to keep.